PSYQ Utility Library
Helpful C++ classes for Playstation 1 programming using PSYQ SDK
This will be my development log as I attempt to create a (hopefully!) useful toolkit for PSX programming in C++ using the original PSYQ sdk.
I tried to do something similar a few years ago when I was new to programming - PSX_App on my github - but now that I've had more experience with both C++ and how the PS1 hardware/system works, I'm hoping to make something of higher quality and that can do more than just draw a 3D plane, lol.
The source code will be stored here on bitbucket for now but I think I'll end up using it to replace the repo on github once I feel its a bit more worth sharing.
10/19/2019
I've actually been working on this for a couple of days, but didn't think of keeping a log until today. That being said, I've had some decent progress so far, and have the following classes implemented:
- System
- Responsible for initializing/updating the PSX graphics system and other hardware init needs
- Model
- Represents a generic 3D object which contains vertices, normals, colors, and is drawn by sending
all of its vertices to be drawn as triangles by the System class. TODO - texture support
- Cube
- A 3d object that inherits from Model, just adds default vertices and normals
to the model so it can be drawn instantly without the need for data to be loaded
or anything
- Camera
- Contains a physical location and view matrix representing camera/view coordinates in 3D space. Can
be moved around as an FPS camera currently, by inheriting from the FPS_movable_object class.
- Sprite
- A simple textured quad primitive drawn in 2D by the system class. It isn't drawn in the system
order table and would be simply overlayed on top of any 3D objects drawn in the same loop, because
it is drawn with DrawPrim() (drawn instantly by the GPU) as opposed to AddPrim() (added to packet list
and drawn on next update)
- Light
- Contains a color, direction, and angle of a light to be used by the GPU/GTE; I think?? that it represents
a point light but I'm honestly not a 100% sure; I need to fool around with it more to figure that out...
The System class contains a pointer to one of these which is used globally by all Model classes drawn (or NULL
for no lighting)
What I spent most of today working on, however, was the Pad class (as in joy/directional pad). This class will be used to access the controllers on the playstation. It turns out that getting the analog sticks to work is much tricker than I would've expected!
So PSYQ provides you two ways to access the controllers. The first is much simpler and uses these basic functions:
PadInit()
PadRead()
Pretty straightforward - you initialize the controller system with PadInit() and get the buttons status with PadRead(). This would be great, but there's a slight issue: you can't access the analog sticks or rumble motors this way :(
So instead you need to use this set of functions:
ResetCallback()
PadInitDirect()
PadStartCom()
...
Among other functions. Instead of calling PadRead() each time you want to check controller values, instead the PSX BIOs auto read and store controller data into the buffers you send to PadInitDirect(). The PadStartCom() function tells the BIOs to do this. Since this is done automatically every vertical sync (I think) in the background, concurrency issues are introduced (reading from your data buffers while the BIOs are trying to write to them at the same time) and I kept freezing and crashing the emulator/playstation! Thus I spent the afternoon looking at the PSYQ documentation and code samples. I ended up finding this thread in the PSX dev forums which contained an analog controller demo/example. Compiling and running this example worked fine on its own, but when I tried to integrate it into my project I was still crashing #!%$^&
After some more tinkering, I figured out that the issue was the order I was initializing things with the System and Pad. Basically, the order of important initialization functions I was using was:
ResetGraph()
InitGeom()
ResetCallback()
PadInitDirect()
...
but what I needed was:
ResetCallback()
PadInitDirect()
...
ResetGraph()
InitGeom()
So I was initializing graphics first, when instead I needed to initialize BIOs system callbacks (ResetCallback) and do controller stuff first. The only issue I have now is that the vibration is set on immediately once you start the program and can't stop it, lol. But, I think this should be a pretty easy fix and I'll work on it later.
10/20/2019
I fixed the controller vibration issue mentioned previously. The issue was that the buffer which stores each actuator/motor speed wasn't being initialized, so they had garbage starting values when the program starts which had non-zero values, so the controller library interpreted that as the motor being 'on'.
Motor[0] = 0; // the first actuator, which only has an on/off state (0 or 1)
Motor[1] = 0; // the second actuator, which has a variable speed from 0 to 255
Once that was fixed, I cleaned up the class a little and added accessor functions to get button values and analog stick values. For the analog sticks, the values for each x/y axis is a value from 0 (pushed far left) to 255 (pushed far right). I had the accessor functions offset these values by 128 so instead the client will read analog values in a range from -128 to 127, with 0 being the default middle value. This makes it easier to distinguish between left/right or up/down.
The final steps for the Pad class will be to add vibration accessors for the client and add controller 2 support. After that will be either texture loading or font loading (although I guess font loading would involve loading a font texture anyways, so probably that)
10/21/2019
Added second controller options and vibration function options. Ez-peasy. and also cleaned up the Pad code.
An interesting note from adding controller 2 support is that all of the PSYQ library controller functions use 0 and 16 (0x00 and 0x10) instead of 0 and 1 for specifying which controller the function is using. My guess as to why this is is that the controller number argument is used to represent the 16th bit of the instruction sent to the controller. Meaning, instructions with the 16th bit set to 0/1 are for the first/second controller. Just a theory.
0b1000000000000000 // 16th bit == 1 --> command for controller 2
0b0000000000000000 // 16th bit == 0 --> command for controller 1
10/22/2019
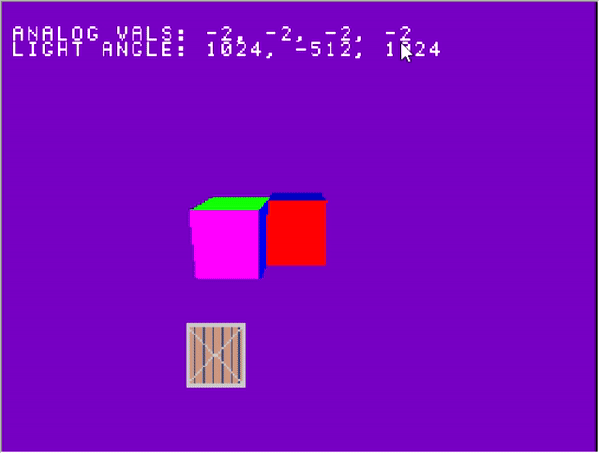
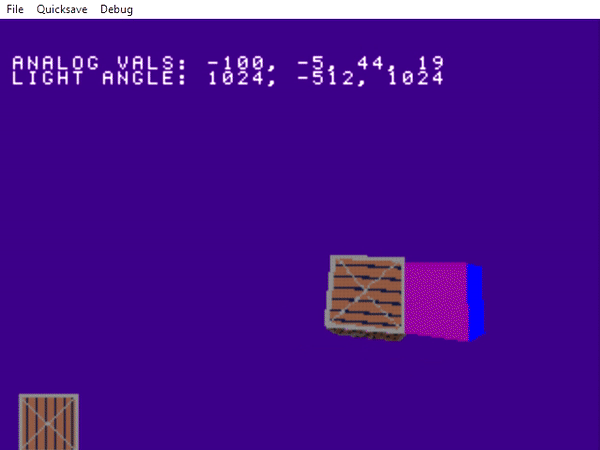
Added basic texture uploading (texture class) and modified Sprite class to use it. Also added bmp2array utility to read 16-bit bmps and print out a C-array with its texture data. Other bit depths like 8bit and 24bit are TODO still. Probably more important is 8 bit in order to preserve VRAM. The 16-bit bmps can be created by exporting images from GIMP as bmp, then under 'Advanced Options', select X1 R5 G5 B5 format.
Another TODO is to have an option to enable/disable transparency. The PSX treats any exact black color in a texture (all zeros) as transparent. I think it'd be nice to have an option that automatically slightly increases the brightness of any black colors in the texture that way they aren't drawn as transparent by the psx unless desired.
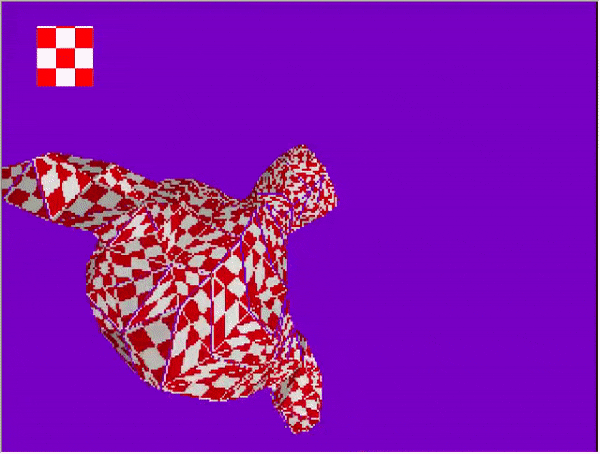
I made a simple crate texture to test, and can move it around the screen with the directional pads, which can be seen in the screenshots below :)
10/24/2019
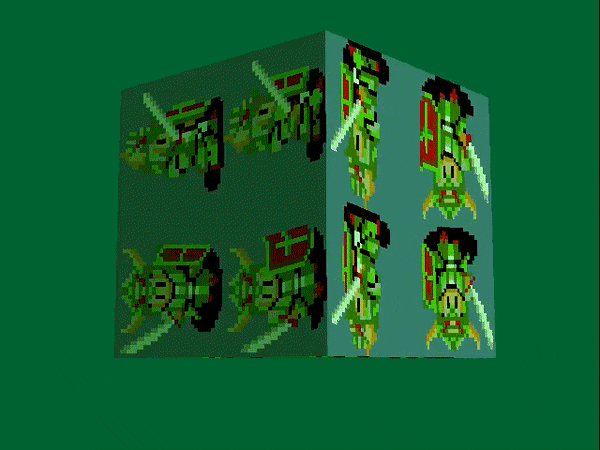
Added texture to models (Model_textured, Cube_textured) classes. Moved some of the primitive setting stuff internally to the texture class; as the functionality was more related to textures than models. Finally, sprites and models can now call set_texture to share the same texture, which prevents unnecessary multiple loadings of the same data.
I noticed the test program somtimes is freezing on the PS1 hardware; I'm assuming it's related to the Pad class again. Oh well for now; it happens seemingly infrequently so I'll ignore it.
10/25/2019
Added a Font class, to load bitmaps fonts (images) and render text with them. This is done by calculating where in the image the appropriate character is based on its input ascii value.
The fonts I used to test are by ZiNGOT on opengameart.org which I reorganized as 8x4 tables (they came entirely horizontal/vertical, which wouldn't fit well in PSX Vram).


10/29/2019
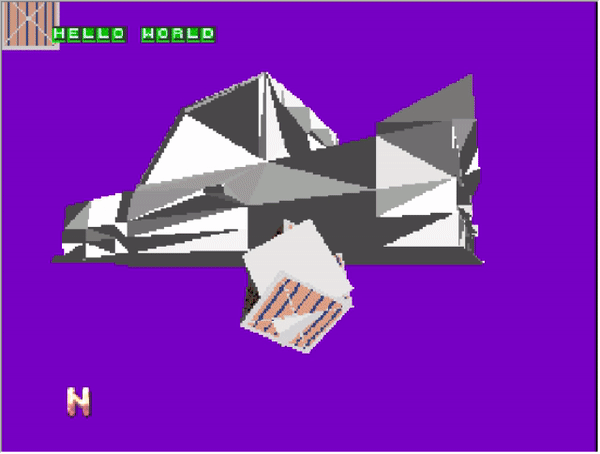
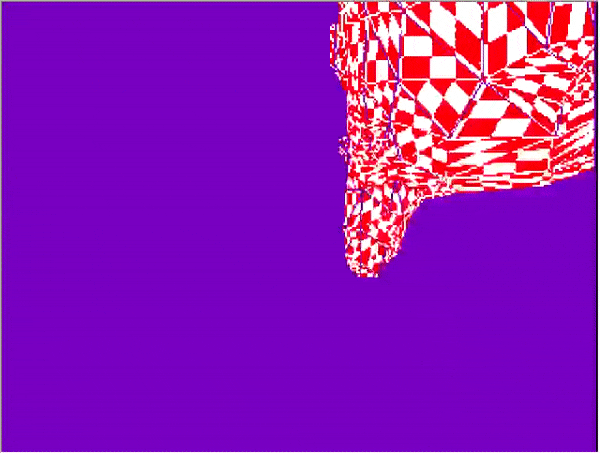
Have a 3D model of a car partially loaded. Input was a simple car model from here, loaded into Blender and exported as a .PLY file, then I wrote a program to parse the .PLY and print out vertex, normal, and face index arrays to store in a header file. The arrays are set as options to the Model class in the main program. The PSX does have a specific 3d model format (.TMD) so I suppose that might be worth looking into.
I think something might be off with the normals as the result looks kind of funny:

But, at least progress was made :)
10/30/2019
Fixed the orientation of loaded car model from ply2array. The issue was the combination of two factors: first, the car had the wrong orientation to begin with in Blender (it was pointing towards the Y axis, not the Z axis), and second, the Y and Z coordinates needed to be negated in ply2array.c. Now the car points forward and is flat like its supposed to.
11/04/2019
Added lookat camera to hopefully use as a third person perspective. The camera currently follows/targets the car model I've loaded. The camera code was basically just copied from the PSn00bSDK examples. I think I need to convert the two spinning cube coordinates to fixed point format as they both seem to be stuck together now (need to be scaled by ONE aka 4096).
11/07/2019
Added third person rotation to the camera. Technically it needs a bit more tweaking (rotation around the x axis is a bit wonky, but feels generally smooth so its good enough for now). Took me a little while to figure out how the angles work to move the camera around the target like a sphere. These two links were pretty helpful:
- https://www.youtube.com/watch?v=PoxDDZmctnU
- https://gamedev.stackexchange.com/questions/63114/how-do-i-rotate-a-camera-around-the-y-axis-of-the-object-its-looking-at
Additionally, I had to experiment a bit with the PSX 'rcos' and 'rsin' functions in combination with fixed point Q4.12 format to get the right combination of divisors/conversions between regular and fixed point formats. What I found is that basically for each multiplication between two fixed point numbers, you have to divide the result by 2^n (shift right by n). So for two multiplications you have to shift right by n twice. So my final current camera position offsets are calculated as follows:
offsetX = (rsin( yaw ) * radius ) >> 12;
offsetY = (rcos( yaw ) * radius ) >> 12;
offsetZ = (rsin( pitch ) * radius ) >> 12;
where the shifts divide out the n in Qm.n format (12 in this case). The result looks like so:
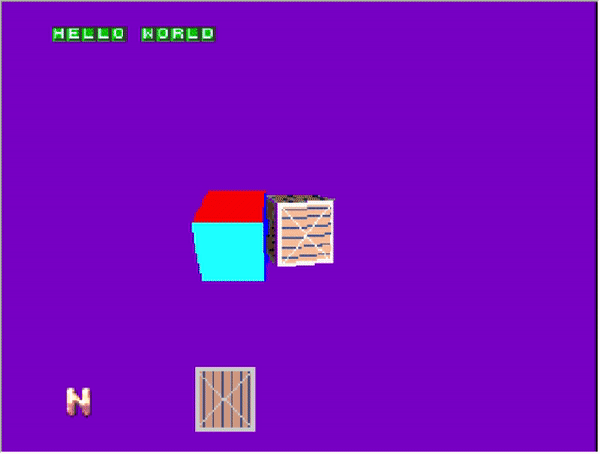
04/04/2020
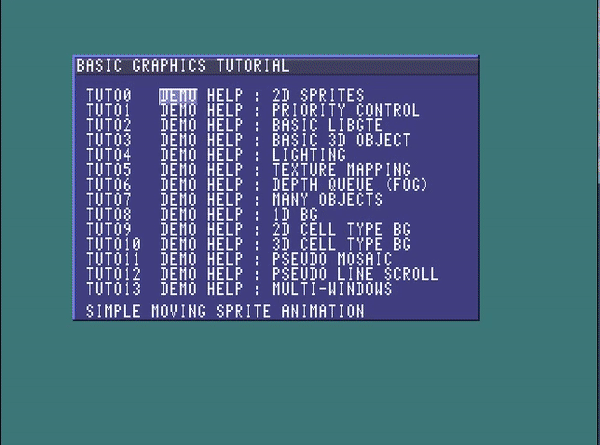
It's been a while; I decided to go back and redo the PSYQ toolkit sample tutorials in C++. Hopefully I'll actually finish them this time. My intent is to learn more at the 3D level to try and help with the car thingy I've logged above up until this point. I've followed the dev tutorials up until a certain point previously (apparently 2 years ago!) going off of my github repo: https://github.com/williamblair/PSYQ_cplusplus/
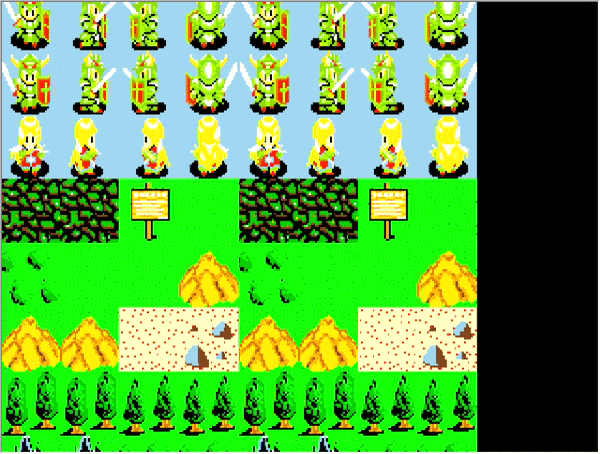
Today I sort of finished the first two:

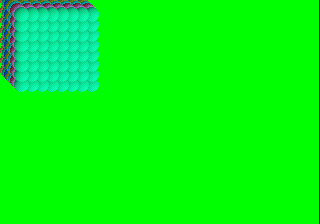
By sort of I mean they don't move or accept controller input. The background is bright green as I wanted to make sure I could tell the main drawing was working and not frozen or crashed (would show a black screen if this was the case)
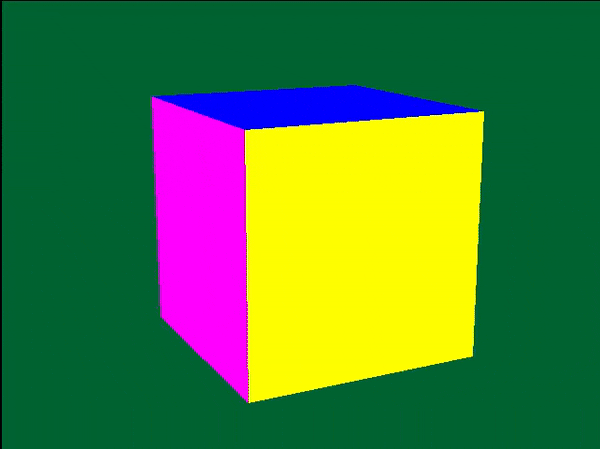
04/05/2020
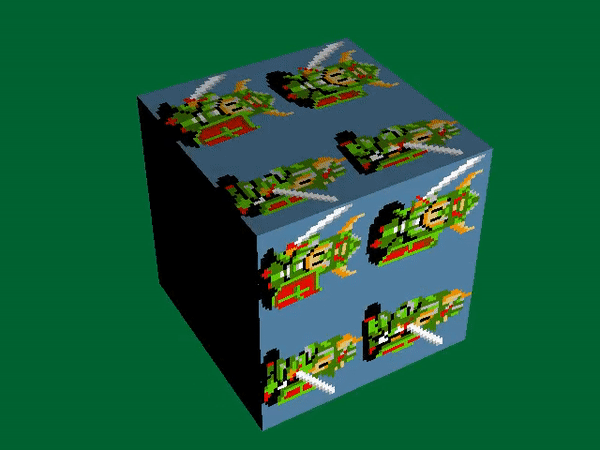
Today I caught up where I had previously gotten with the PSYQ tutorials which was tutorial 5, a textured and shaded cube. Tutorials 3-5 are a cube, a cube with lighting, then a textured cube with lighting. Looking ahead, I see the next sample uses a fog effect, so that'll be interesting
These ones actually take input as you can rotate the cube around with the controller
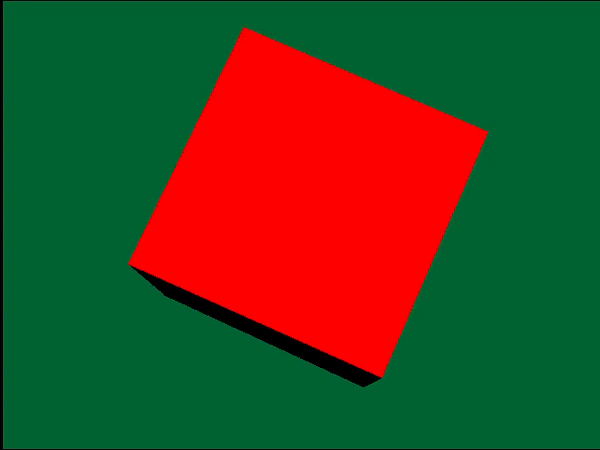
04/08/2020
Finished tutorial 6: fog/depth queue lighting. This one is basically the same as tutorial 5, except you replace the function call that calculates the color of the cube based on lighting to a different one that uses the interpolation value based on depth. You also have to set the fog color and the distance range to use for fog
04/13/2020
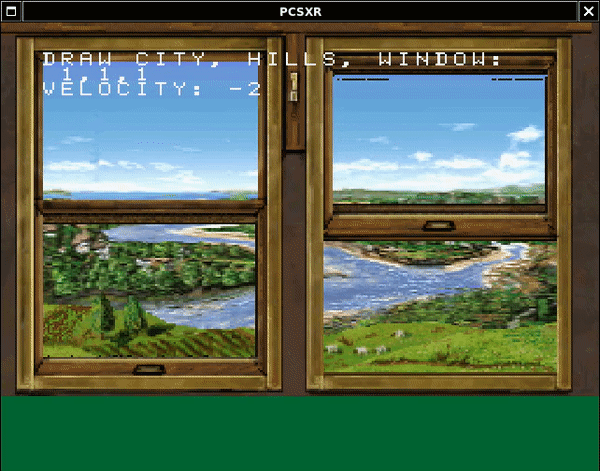
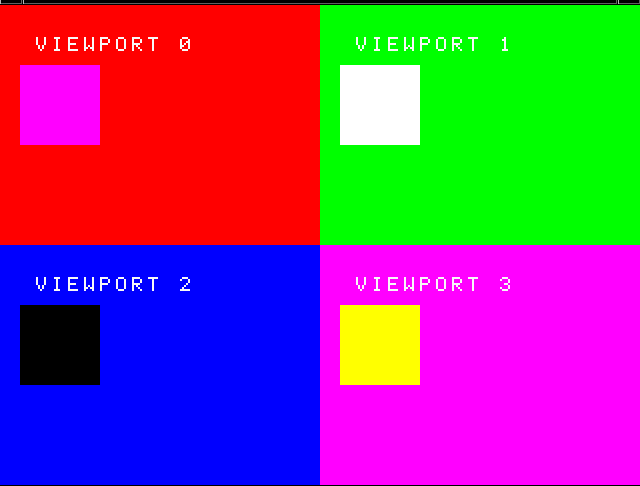
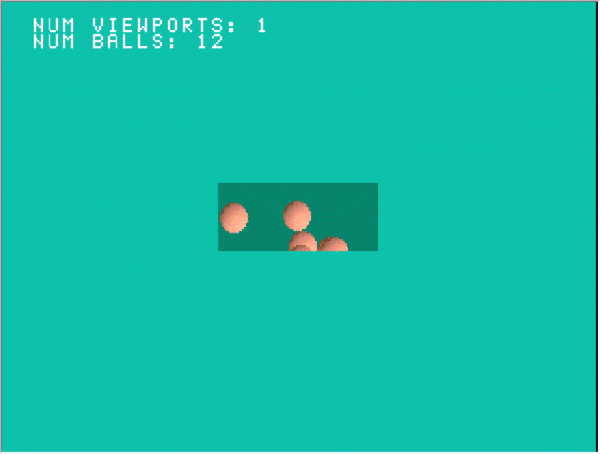
Finished tutorials 7-9: Multiple/Many cubes and world coordinates, seamless scrolling 2d backgrounds and viewports (i.e. what you would use for multiplayer split screens). For tuto 7, each cube shares the same world transformation matrix (how they all seem to be grouped together) but have their own local transformation matrix. Tutorial 8 was more interesting: each background (the window, hills, and city) are actually each made up of 2 ./images. the ./images are drawn next to each other with an offset relative to the current 'x' offset. This offset is updated each frame as the 'x' offset increases or decreases. For example, if the screen width is 256 (which it is here), and the x offset is 100, then the left image is drawn with an x offset of 100 and the right image is drawn with an x offset of the difference (256-100=156). Finally, for tutorial 9, each viewport shares the same display environment (the total screen size = 320x240 pixels), but have their own draw environment (each taking a quarter of the screen). All drawing and primitive coordinates are relative to the current draw environment.
04/18/2020
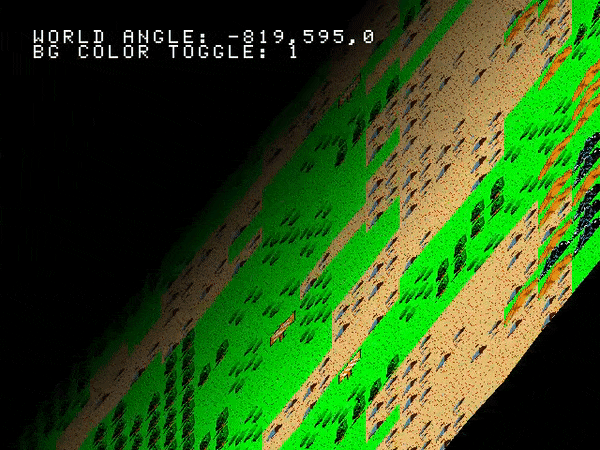
Tutorial 10: scrolling background done. This one emulates a snes mode-7 style psuedo-3d background. How its done is actually just drawing all of the tiles on a real 3D polygon and then rotating it so it looks just right. The trikcy part is offsetting map and uv coordinates properly. Additionally, you can notice that moving forwards and backwards produces a kind of jiggle effect. This is due to the entire world plane shifting to offset when you're moving between tile coordinates (e.g. moving forward/backward by 3 when tiles have a size of 5). Left and right does this as well, however it's not noticable because the far left and right edges are offscreen. It becomes more obvious if you have the background color different from the darkening texture color.
04/19/2020
Did tutorial 11. This one was called a 'mosaic' effect - the sprite is blurred by zooming in on the pixels. How it works is you shrink the size of the texture area used by offsetting the uv coordinates, then stretching the smaller area out to match the sprite size.
04/25/2020
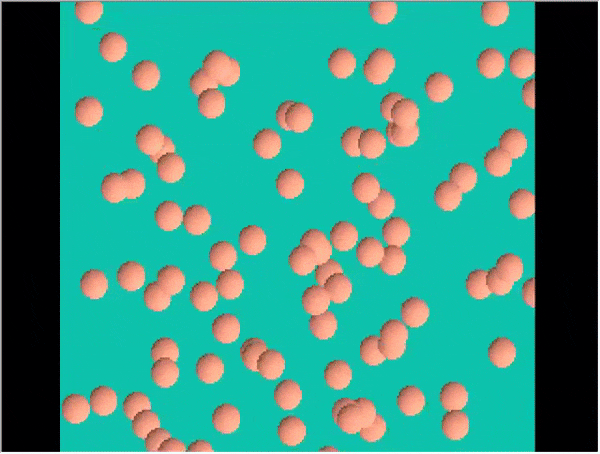
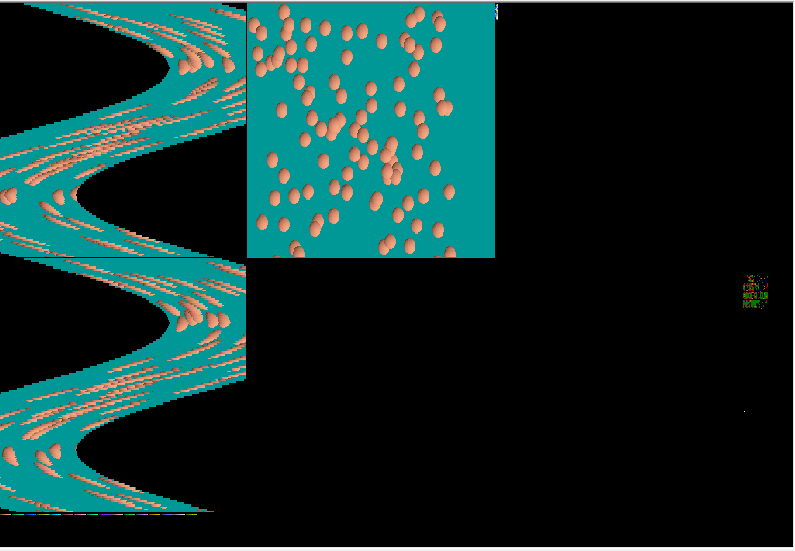
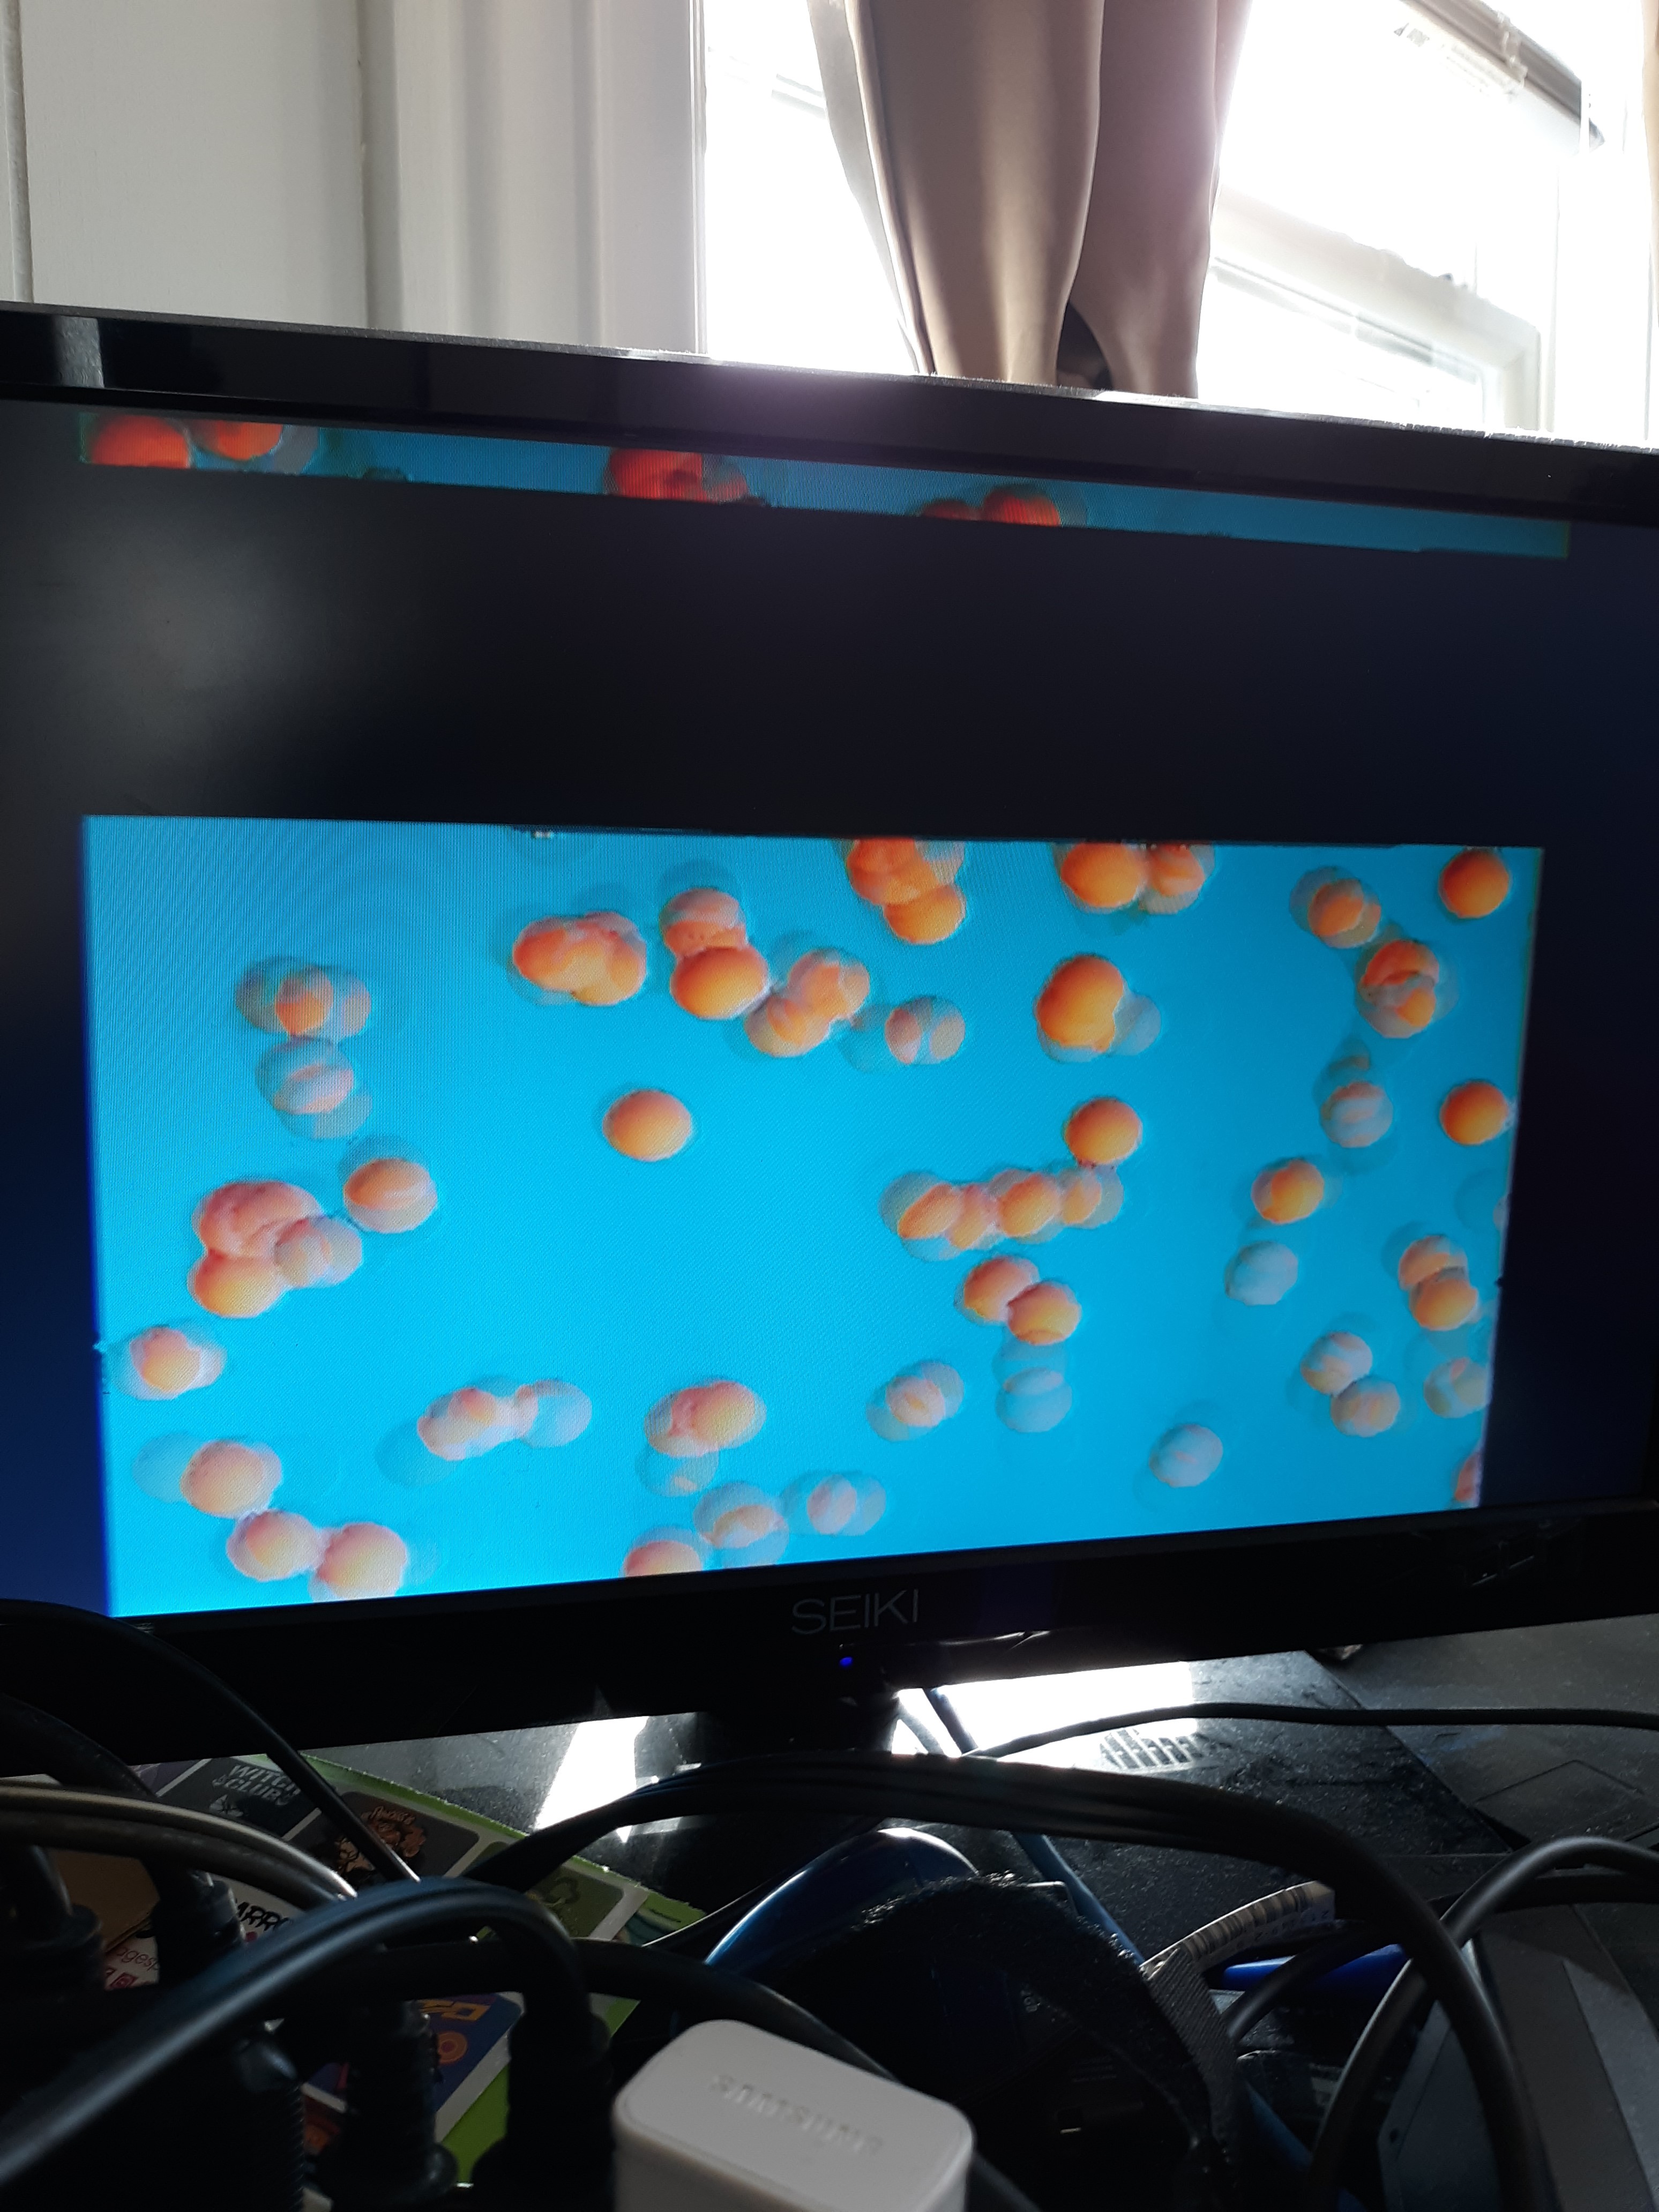
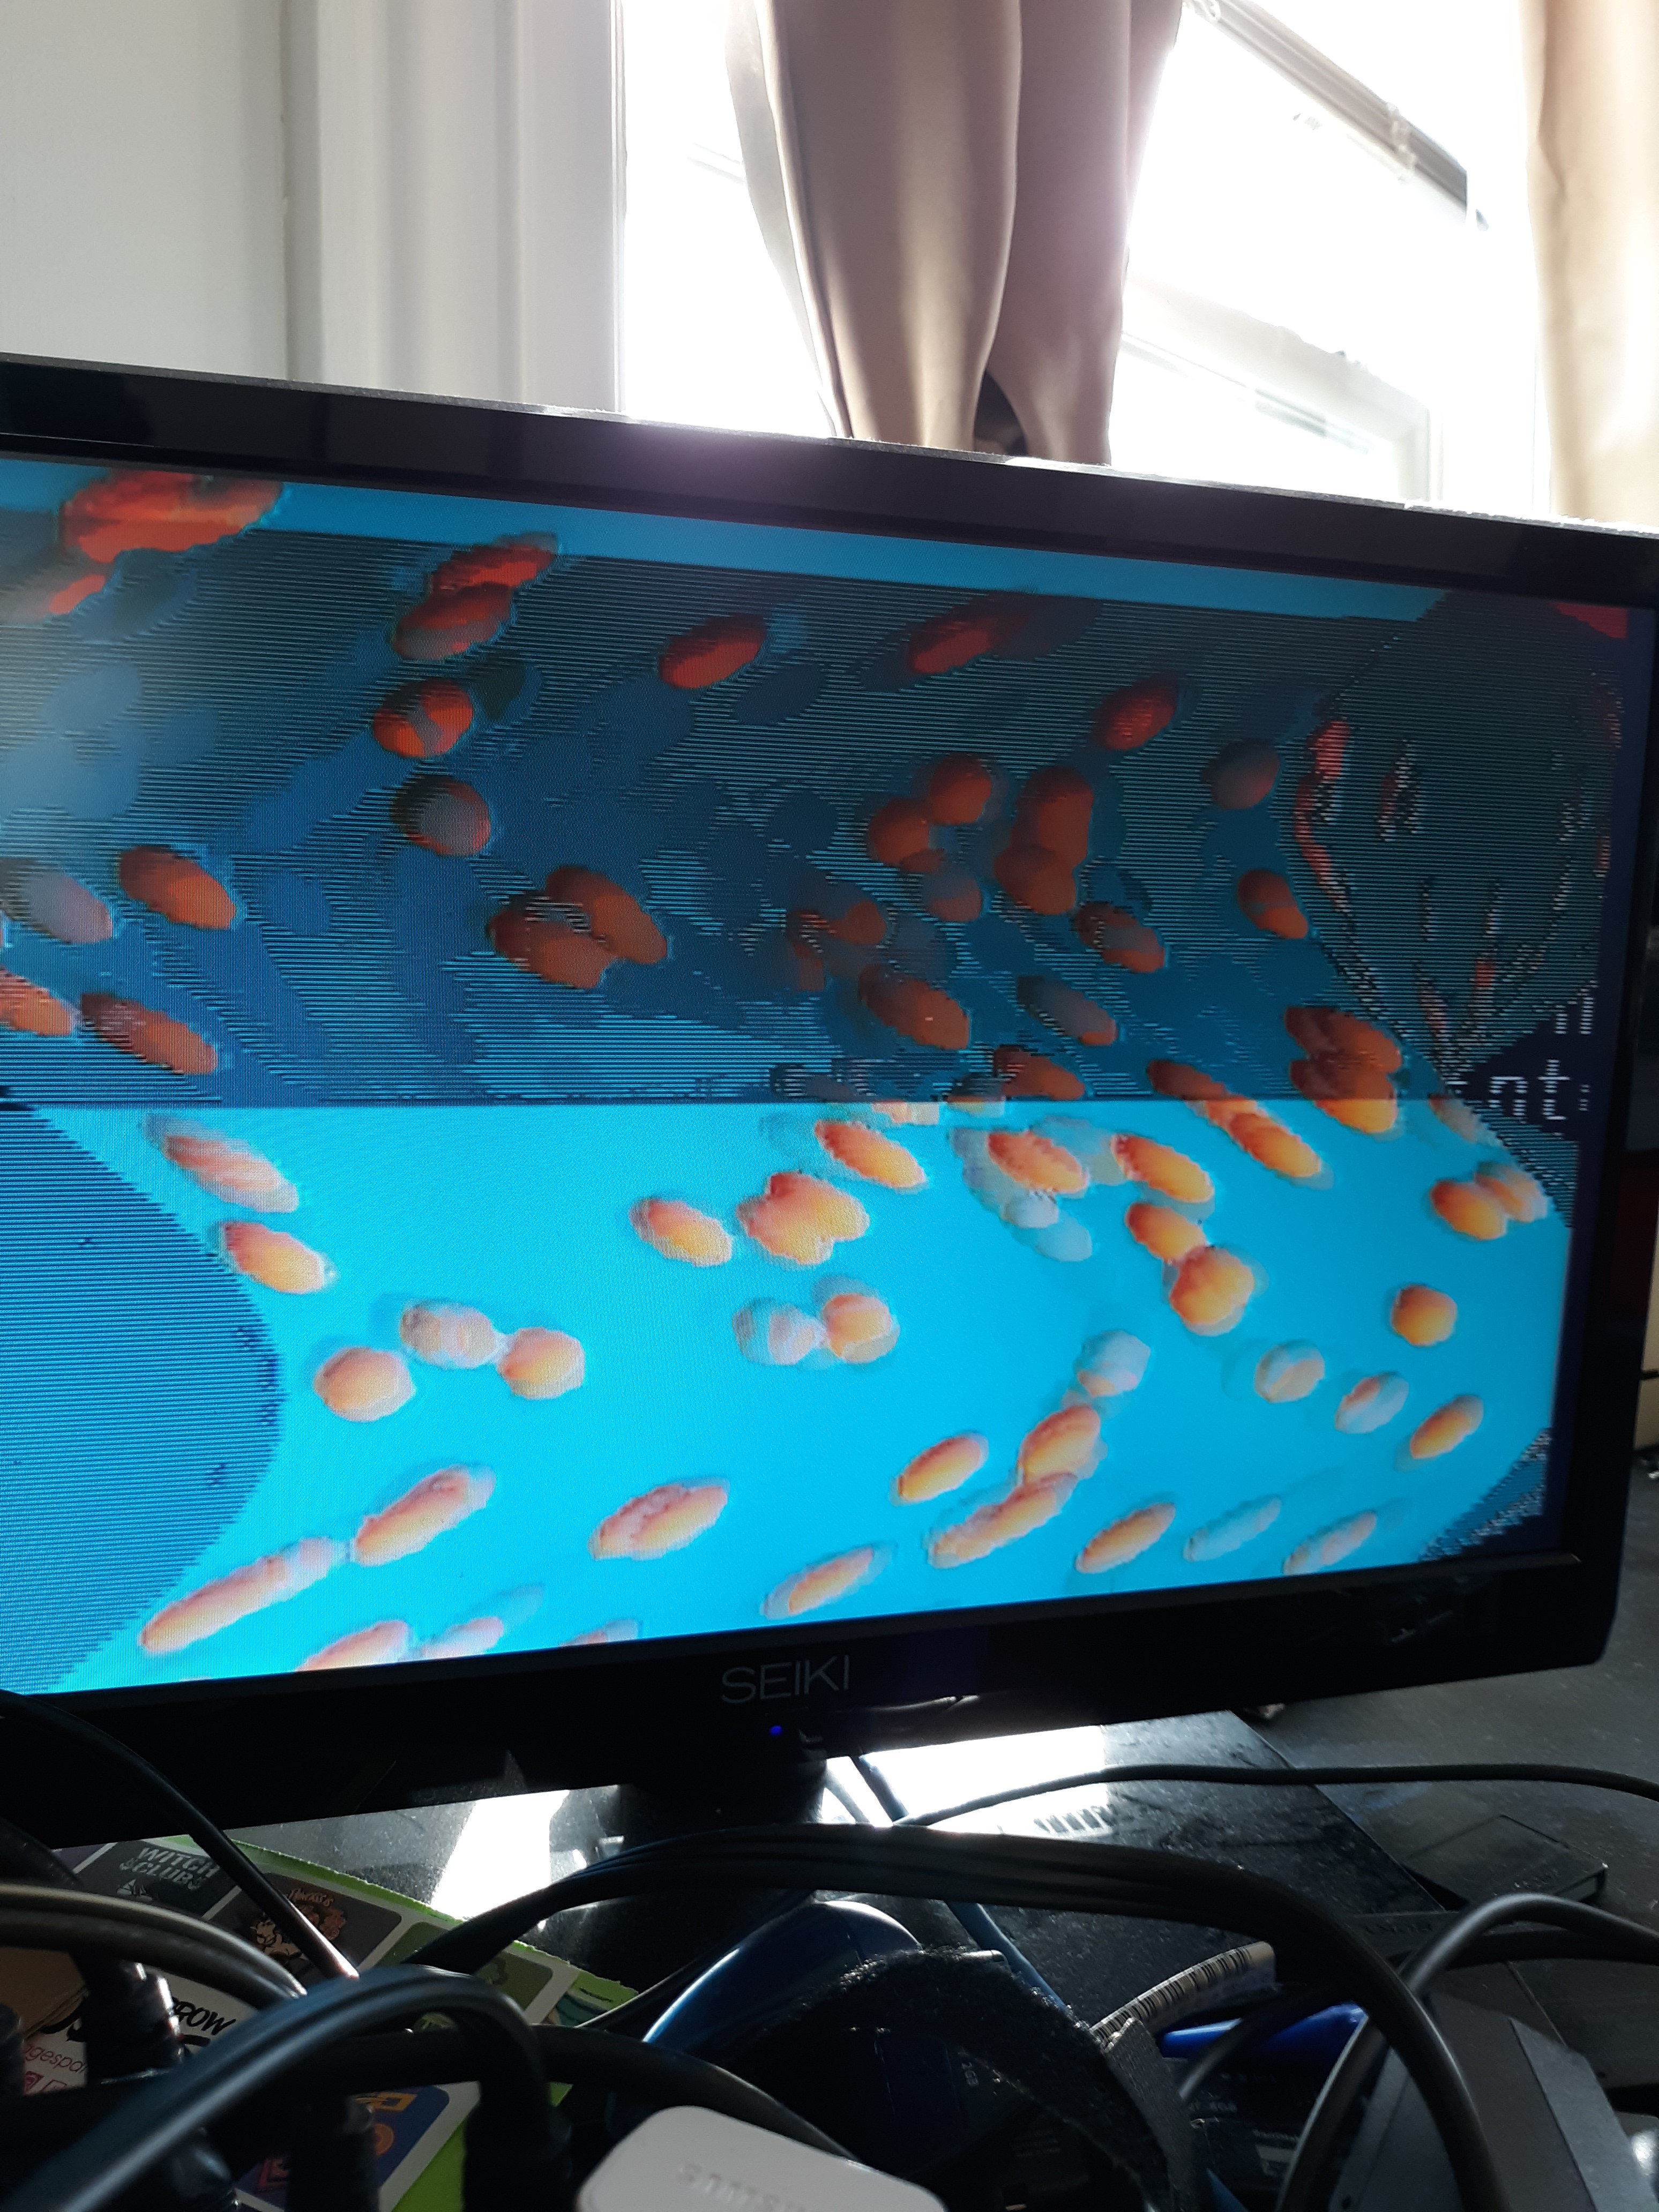
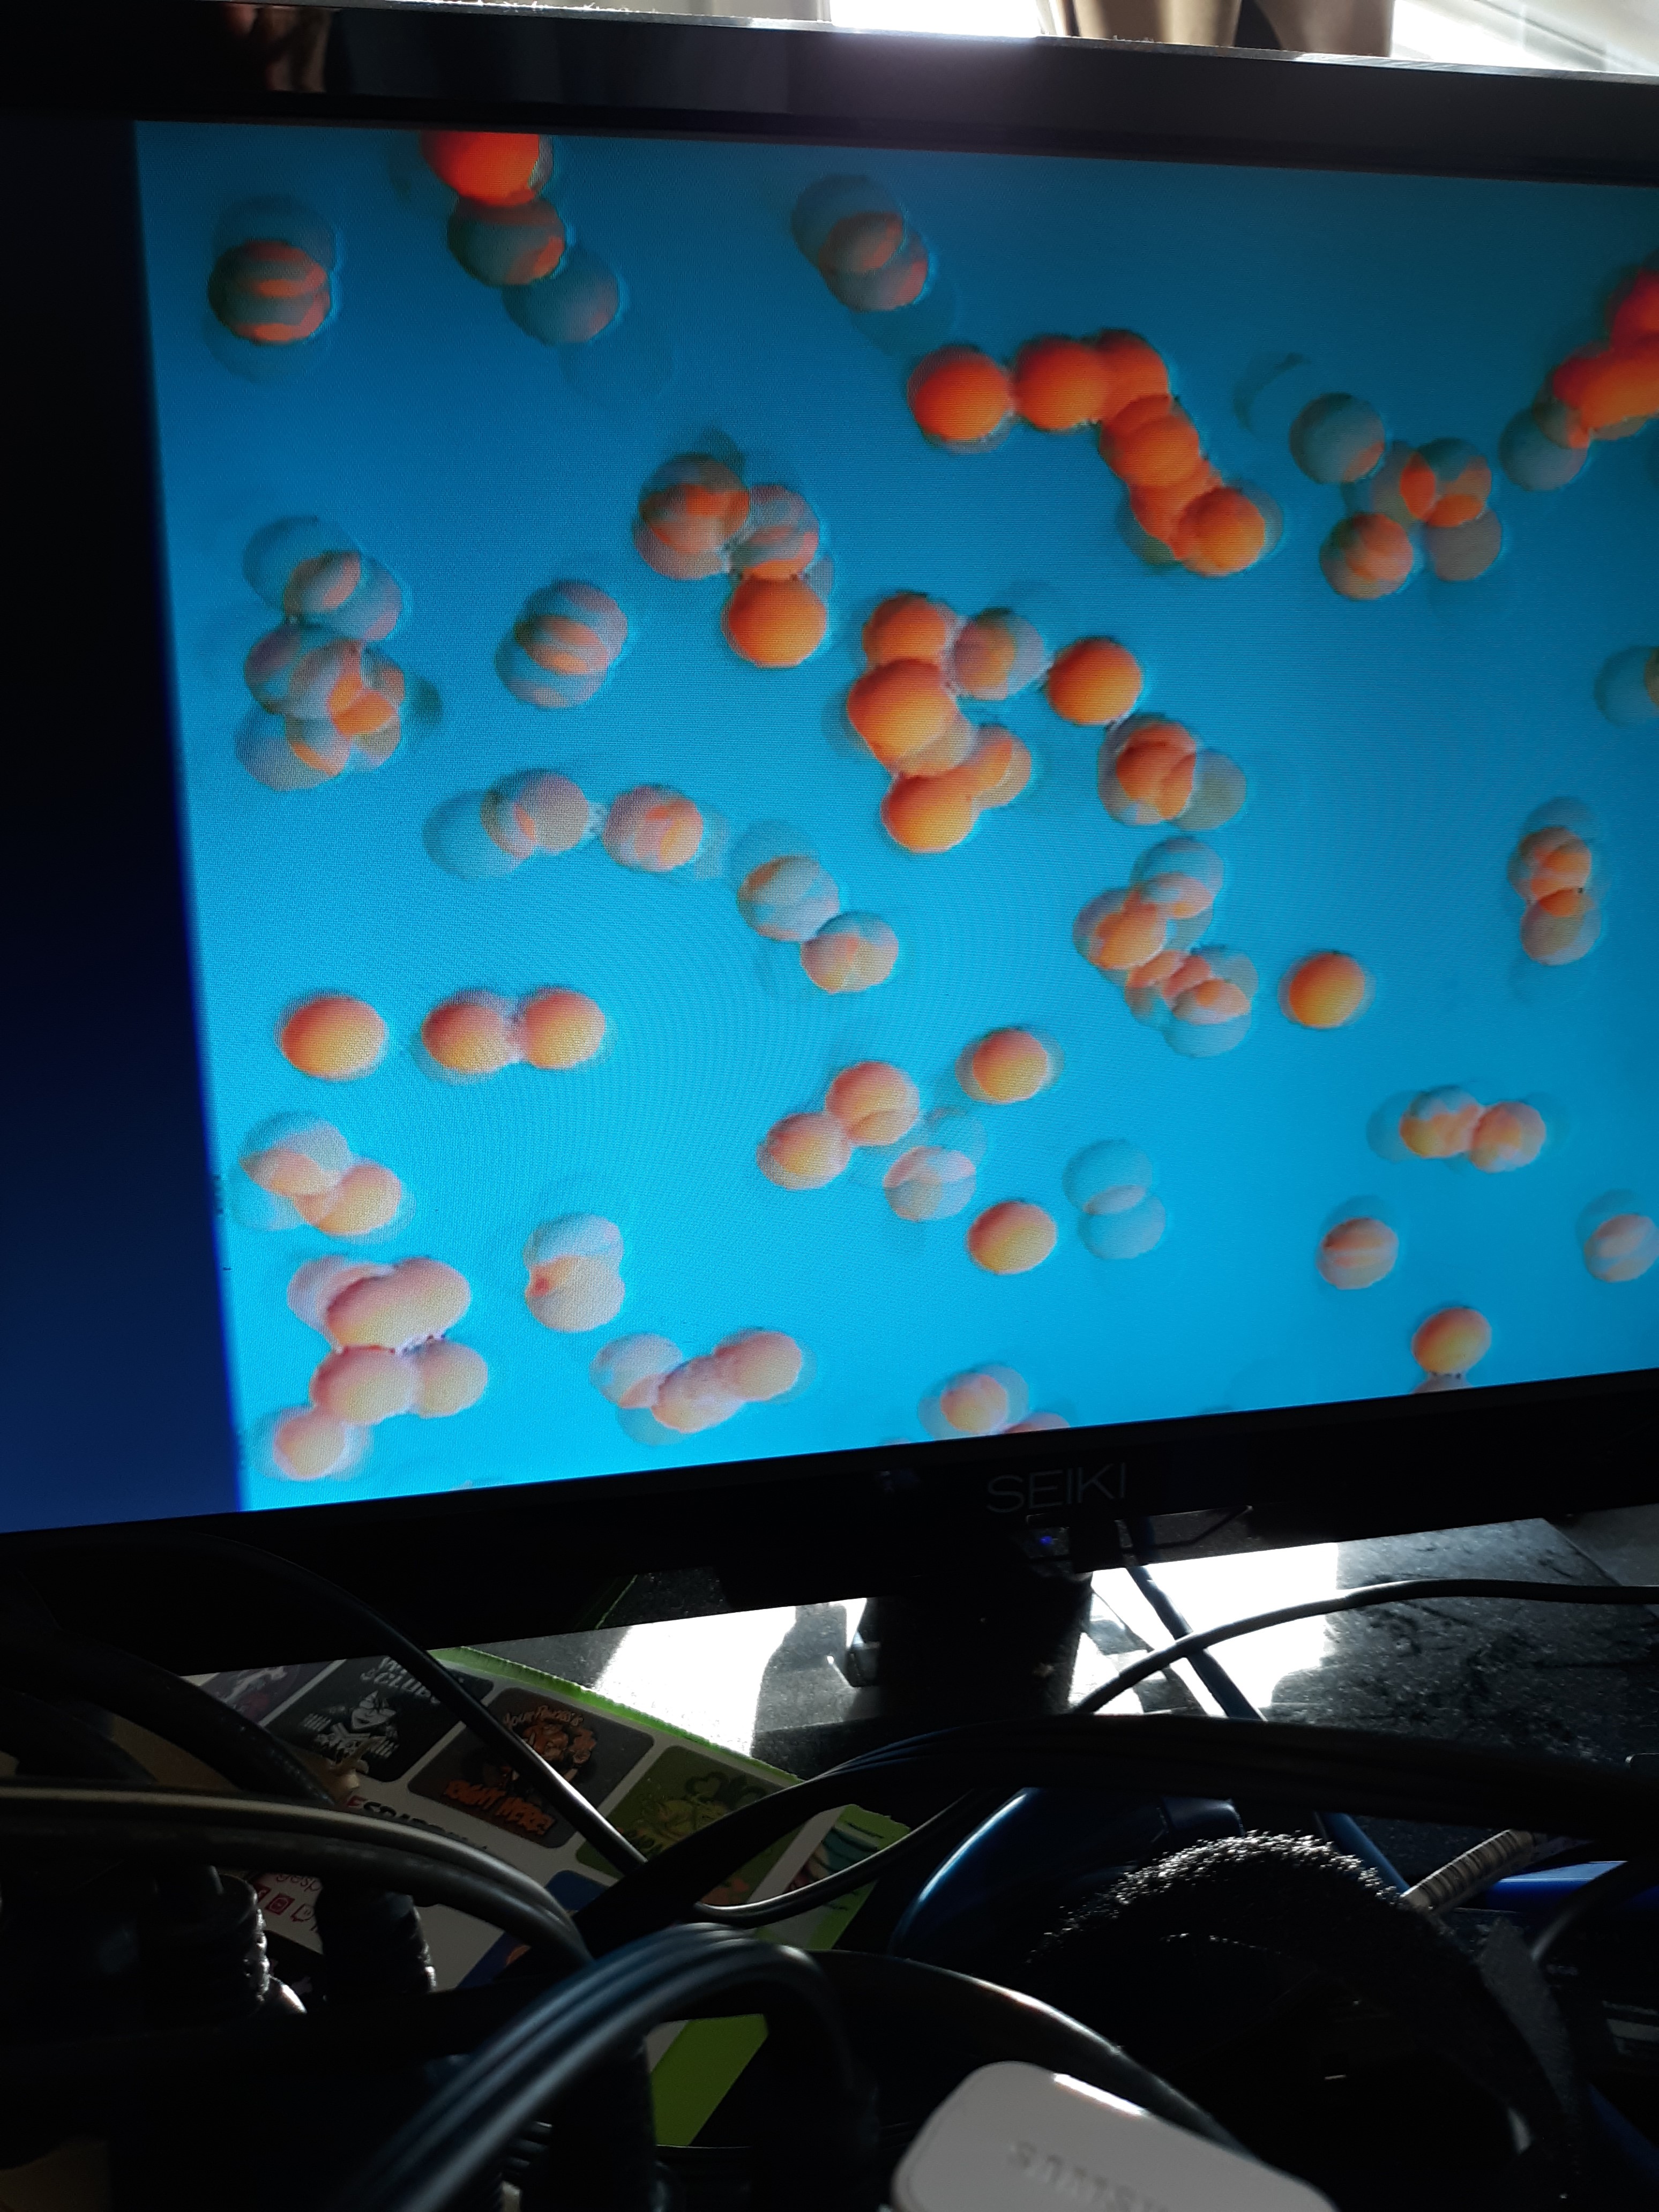
Finally finished tutorial 12 - this one took me a while to get working properly! This program does a screen stretching effect, as seen below. How it works is the screen is actually drawn as a series of sprites for each line (techically in my version, each sprite is 2 horizontal lines) that are offset via a sin wave. The sprites read their texture from an area in VRAM offscreen, which is where all the balls are drawn to before the main screen sprites are drawn.
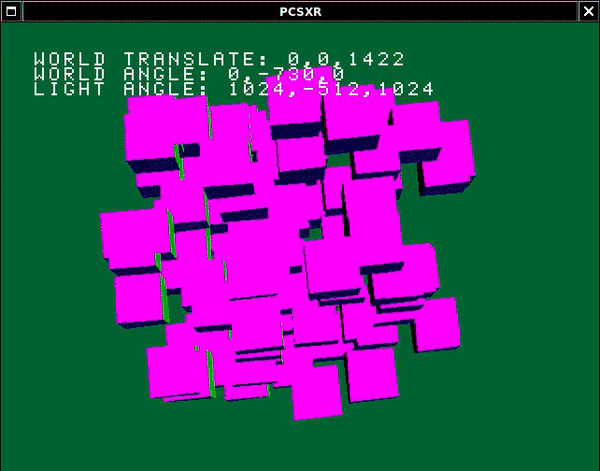
The first issue I had was trying to draw sprites of height 1 - I found out there is a bug in my code somewhere preventing this; so all the sprites have a height of 2 now instead. Additionally, at first I tried using the same drawing area for the balls AND the screen sprite (so both the balls and screen would be read/drawn to/at 0,0 in VRAM), but the sprite texture didn't work properly; so I rewrote the code to separate the areas where the balls are drawn and where the main screen lines are drawn. Finally, because the screen line textures are dependant on the system drawing the balls first, I had to fiddle with GPU synchronization (DrawSync() and VSync()) for a while. Then, when I tried running it on the actual playstation, I had more drawing and sync issues (see the images below). I fixed those by implementing double buffering for the screen line sprites (they were single buffered before), as well as fiddling with GPU syncs again. The end result is pretty cool though :)
04/26/2020
Finished tutorial 13 - this was the last one in the psx TUTO samples folder for PSYQ! The program was just playing with viewports again; however, each of these viewports share and draw the same order table. Additionally, it shows that you can query what the current draw environment is with GetDrawEnv() (the brother of PutDrawEnv()).
Now that I'm out of those samples, I'll have to look for other samples dealing more with 3D that I'm interested in like loading models and cameras, hopefully...
05/09/2020
Working through a video streaming example from PSYQ
This sample streams a video in the STR format (SAMPLE.STR). The original PSYQ sample (psyq/psx/sample/cd/MOVIE/TUTO0.C) uses a file named MOV.STR, in an XDATA folder, however I couldn't find that one. I found SAMPLE.STR instead from a different directory.
Also, kinda as a sidenote, I was playing around with looking in my FF7 disc 1 BIN/CUE copy for STR files; they're contained in the 'movie' folder in the top level CD directory. I was able to mount the disc on Linux and explore the CD that way via
- Convert the BIN/CUE pair to an ISO file:
bchunk <binfile>.bin <cuefile>.cue <out iso name>.iso
- mount the ISO file as read only
mkdir ~/cd_mount
mount <out iso name>.iso ~/cd_mount
Then I was able to play/preview any of the STR files on Linux via the jPSXdec program: https://github.com/m35/jpsxdec. It's a java program, so you'll need the java runtime to run it (on linux at least, not sure about windows) Run with `java -jar jpsxdec.jar`
Then you can open and play STR files; this way I know what the video should look like when it's streaming

In code, there are 2 systems working in tandem to play the video: The STR, and cd libraries. These Open/Init the file from CD and read STR 'sectors'
Then there's the VLC/Decode libraries (What does VLC mean in this case? Not the video player, I presume? lol). These take the VLC data and decode it, storing the resulting image data into a given buffer. We then load the buffer into VRAM using LoadImage(). This VRAM data can be either used as a texture, or sent directly to the drawing environemt area directly (which is done here).
TODO - synchronization/timeing/handle timeouts related to CD reads and safety and stuff
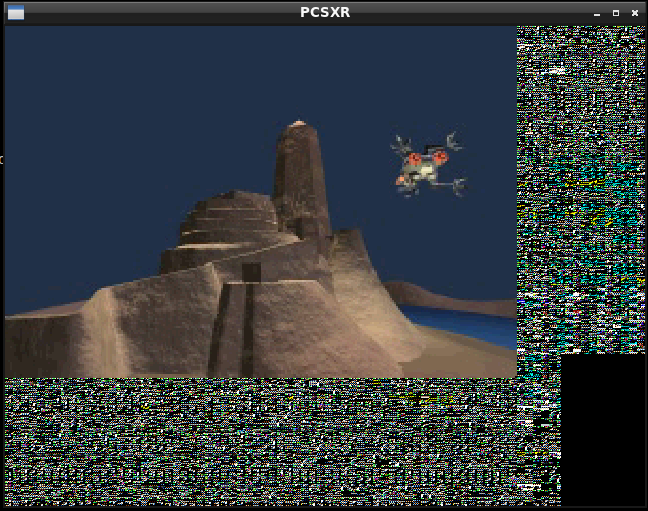
05/16/2020
Continuing with the STR video from last time; made the following updates:
- Added video reset and timing checks (the TODO from last time)
- Tried doing video stream synchronously (loading one frame at a time strictly in main, no callback func). Worked in the emulator but not on hardware; TODO is figure this out. Perhaps theres another video example that does this.
- Based off the code, made a 'StrVideo' namespace which streams the video to a specified location in VRAM (single buffer) to be used as a texture. It'd be nice to make this a class but would have to figure out how to handle the callback function requirement
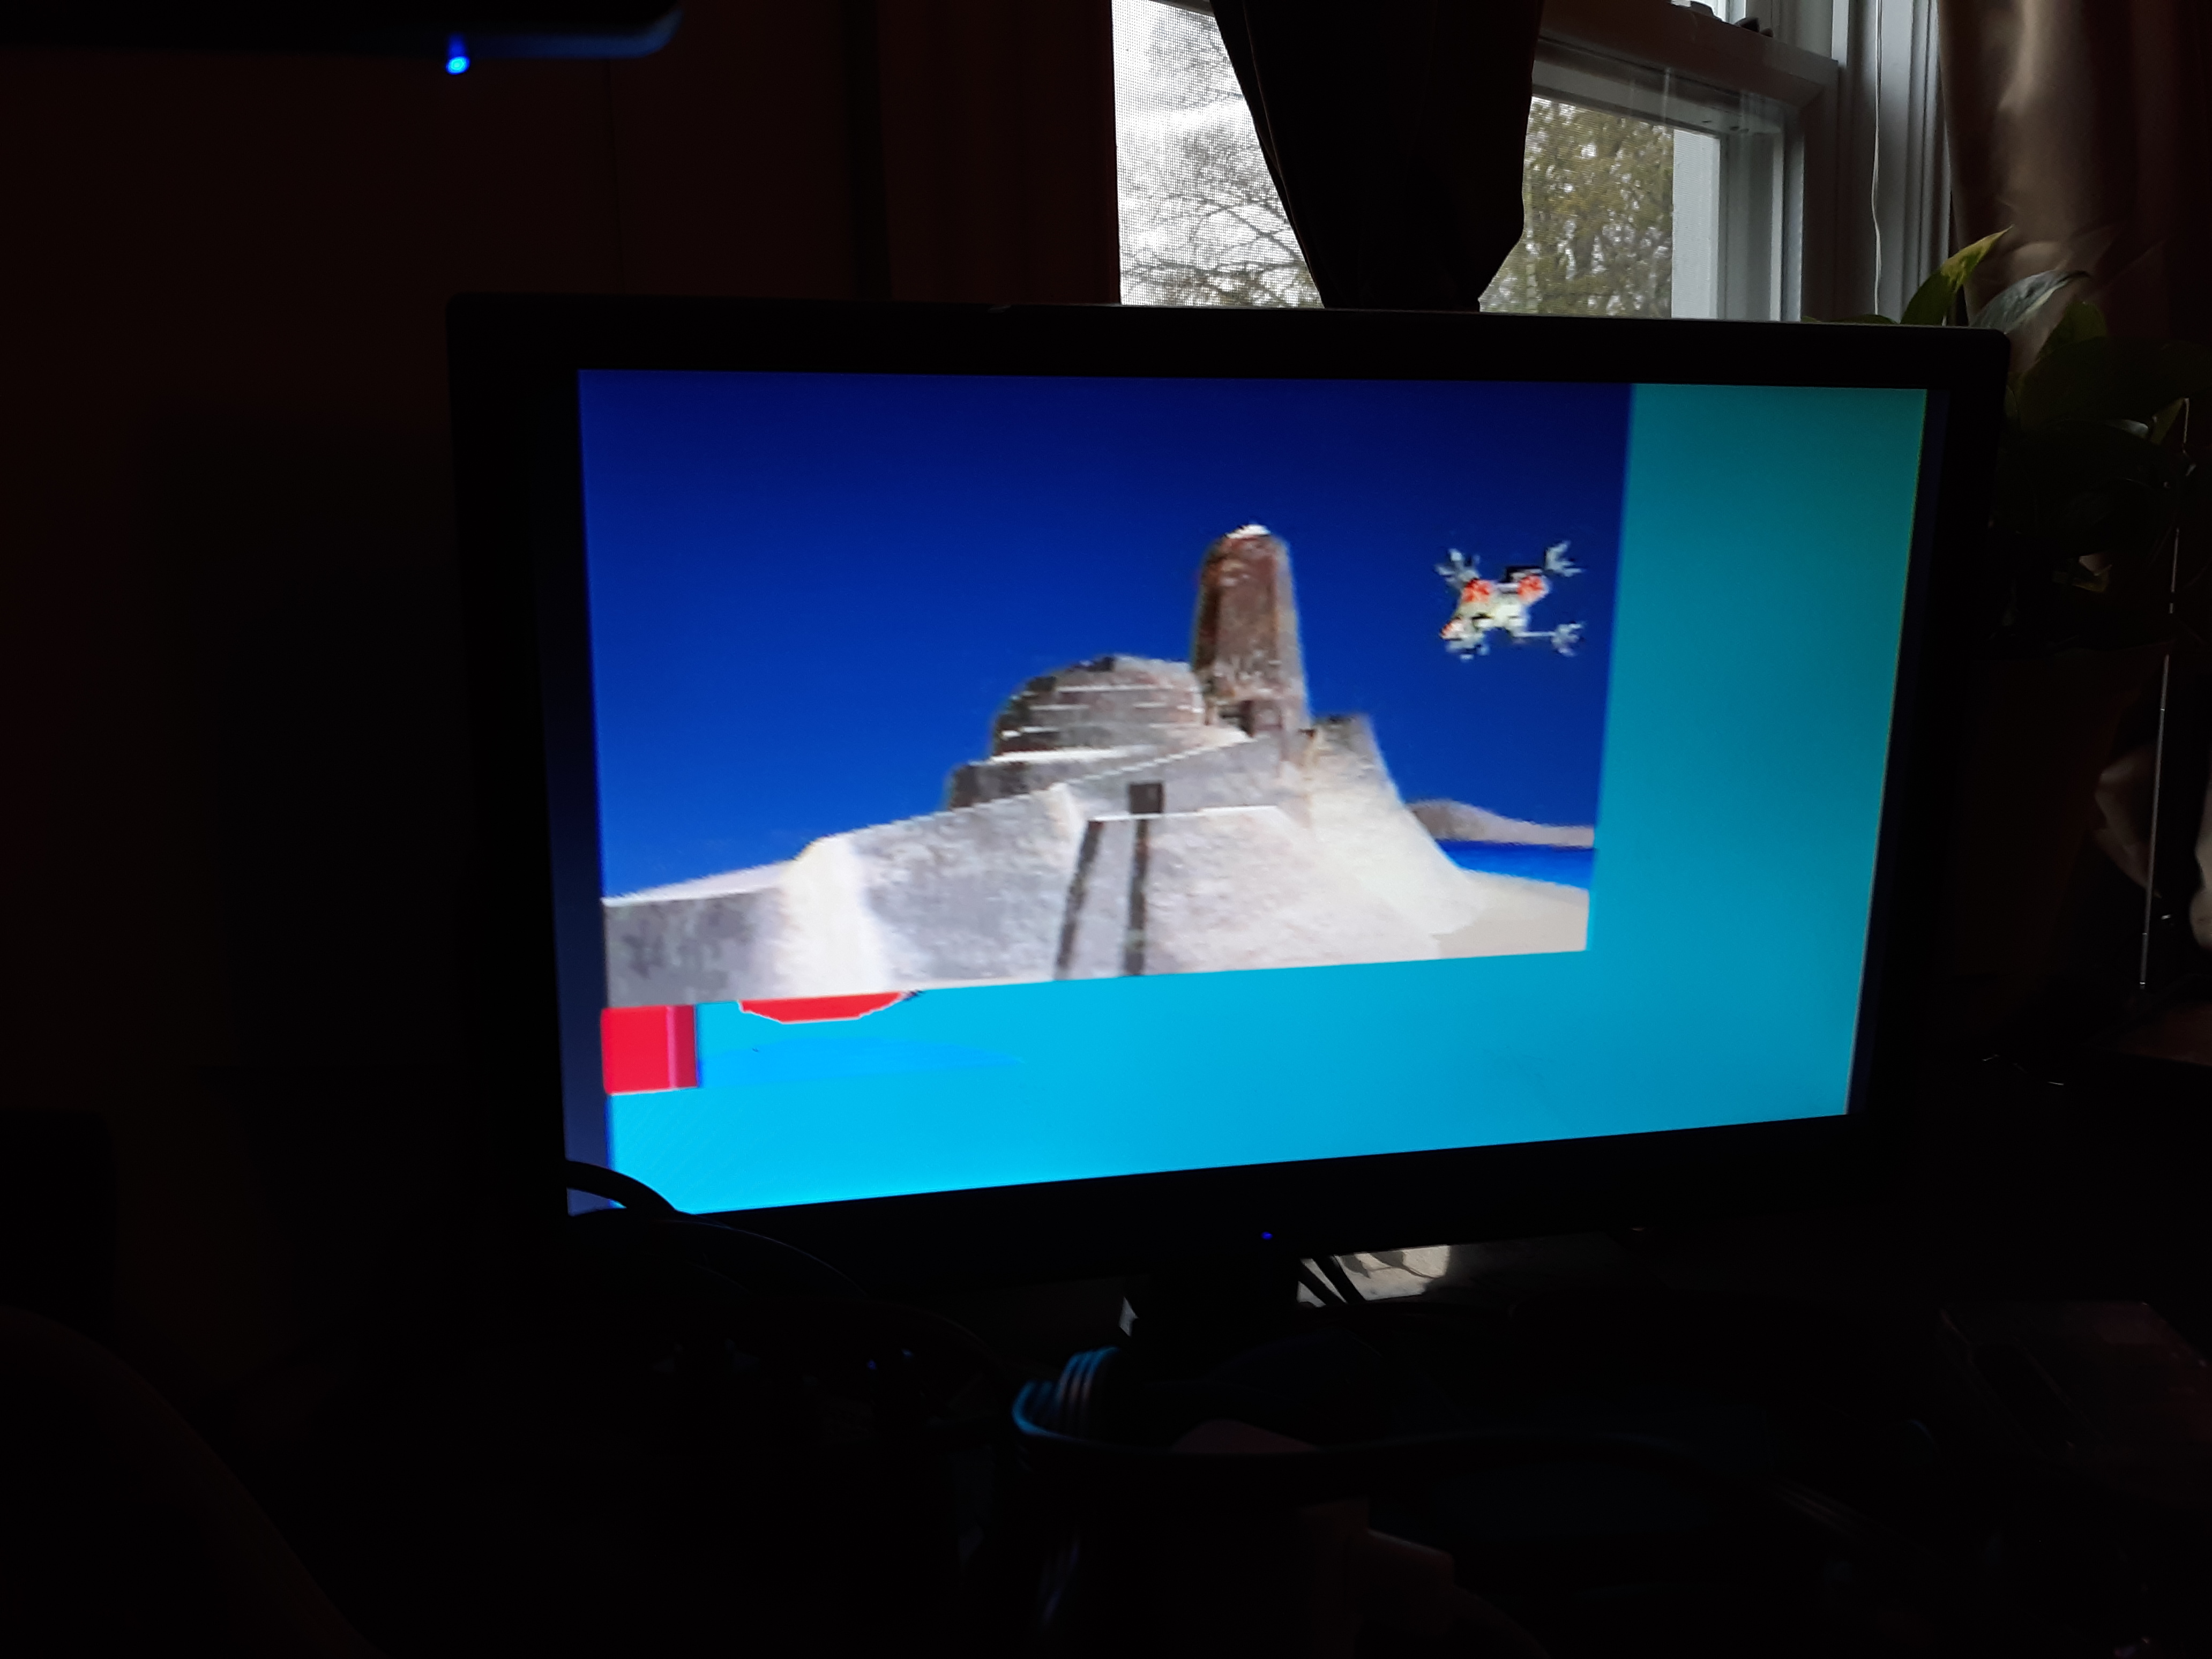
- Tested using this streaming video texture with the Sprite_textured class; confirmed works on hardware
05/25/2020
Continuing with STR video; am having trouble extracting other STR files to test from my copy of FF7 Disc 1
At first I though the code wasnt working properly, but it seems like I'm not getting the proper data when using jPSXdec. The video can be loaded and ran in jPSXdec, but when trying to open the file in mc32 (the PSYQ media conversion utility), I get the following error:
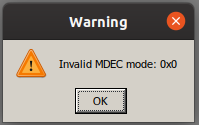
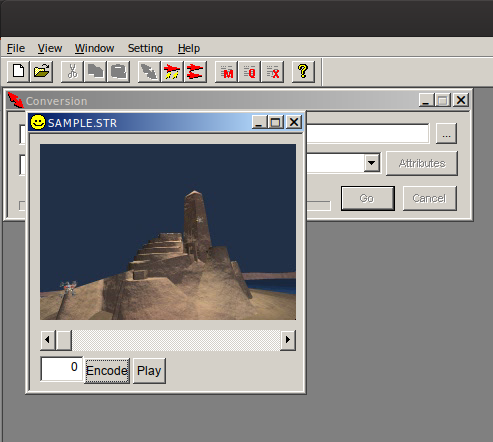
Whereas if I open the SAMPLE.STR used previously, I get no errors and can play the video through mc32 just fine:
Perhaps I can try converting my own videos (must be avi ...)
06/13/2020
Starting to put what I've been learning from "Intro to MIPS Assembly Language Programming" to use - I got a minimum assembly language program to compile and run with NO$PSX using PSn00bSDK/mipsel-unknown-elf-gcc.
First, starting with the basic-of-basics hello world c program:
int main(void)
{
    return 0;
}
If we ONLY compile it (no assembling or linking) using the -S option with GCC:
mipsel-unknown-elf-gcc -g -O2 -fno-builtin -fdata-sections -ffunction-sections \
                        -I../../../libpsn00b/include \
                        -I/d/mipsel-unknown-elf/lib/gcc/mipsel-unknown-elf/7.4.0/include \
                        -S hello.c -o hello.s
We get the following assembly program:
    .section .mdebug.abi32
    .previous
    .nan	legacy
    .module	softfloat
    .module	nooddspreg
    .text
$Ltext0:
    .cfi_sections	.debug_frame
    .section	.text.startup.main,"ax",@progbits
    .align	2
    .globl	main
$LFB0 = .
    .file 1 "hello.c"
    .loc 1 4 0
    .cfi_startproc
    .set	nomips16
    .set	nomicromips
    .ent	main
    .type	main, @function
main:
    .frame	$sp,0,$31		# vars= 0, regs= 0/0, args= 0, gp= 0
    .mask	0x00000000,0
    .fmask	0x00000000,0
    .set	noreorder
    .set	nomacro
    .loc 1 6 0
    jr	$31
    move	$2,$0

    .set	macro
    .set	reorder
    .end	main
    .cfi_endproc
$LFE0:
    .size	main, .-main
    .text
$Letext0:
    .section	.debug_info,"",@progbits
$Ldebug_info0:
    .4byte	0x3e
    .2byte	0x4
    .4byte	$Ldebug_abbrev0
    .byte	0x4
    .uleb128 0x1
    .4byte	$LASF0
    .byte	0xc
    .4byte	$LASF1
    .4byte	$LASF2
    .4byte	$Ldebug_ranges0+0
    .4byte	0
    .4byte	$Ldebug_line0
    .uleb128 0x2
    .4byte	$LASF3
    .byte	0x1
    .byte	0x3
    .4byte	0x3a
    .4byte	$LFB0
    .4byte	$LFE0-$LFB0
    .uleb128 0x1
    .byte	0x9c
    .uleb128 0x3
    .byte	0x4
    .byte	0x5
    .ascii	"int\000"
    .byte	0
    .section	.debug_abbrev,"",@progbits
$Ldebug_abbrev0:
    .uleb128 0x1
    .uleb128 0x11
    .byte	0x1
    .uleb128 0x25
    .uleb128 0xe
    .uleb128 0x13
    .uleb128 0xb
    .uleb128 0x3
    .uleb128 0xe
    .uleb128 0x1b
    .uleb128 0xe
    .uleb128 0x55
    .uleb128 0x17
    .uleb128 0x11
    .uleb128 0x1
    .uleb128 0x10
    .uleb128 0x17
    .byte	0
    .byte	0
    .uleb128 0x2
    .uleb128 0x2e
    .byte	0
    .uleb128 0x3f
    .uleb128 0x19
    .uleb128 0x3
    .uleb128 0xe
    .uleb128 0x3a
    .uleb128 0xb
    .uleb128 0x3b
    .uleb128 0xb
    .uleb128 0x27
    .uleb128 0x19
    .uleb128 0x49
    .uleb128 0x13
    .uleb128 0x11
    .uleb128 0x1
    .uleb128 0x12
    .uleb128 0x6
    .uleb128 0x40
    .uleb128 0x18
    .uleb128 0x2117
    .uleb128 0x19
    .byte	0
    .byte	0
    .uleb128 0x3
    .uleb128 0x24
    .byte	0
    .uleb128 0xb
    .uleb128 0xb
    .uleb128 0x3e
    .uleb128 0xb
    .uleb128 0x3
    .uleb128 0x8
    .byte	0
    .byte	0
    .byte	0
    .section	.debug_aranges,"",@progbits
    .4byte	0x1c
    .2byte	0x2
    .4byte	$Ldebug_info0
    .byte	0x4
    .byte	0
    .2byte	0
    .2byte	0
    .4byte	$LFB0
    .4byte	$LFE0-$LFB0
    .4byte	0
    .4byte	0
    .section	.debug_ranges,"",@progbits
$Ldebug_ranges0:
    .4byte	$LFB0
    .4byte	$LFE0
    .4byte	0
    .4byte	0
    .section	.debug_line,"",@progbits
$Ldebug_line0:
    .section	.debug_str,"MS",@progbits,1
$LASF1:
    .ascii	"hello.c\000"
$LASF0:
    .ascii	"GNU C11 7.4.0 -msoft-float -g -O2 -fno-builtin -fdata-se"
    .ascii	"ctions -ffunction-sections\000"
$LASF2:
    .ascii	"D:\\Programming\\psx\\psn00bsdk\\examples\\bj_progs\\asm"
    .ascii	"1\000"
$LASF3:
    .ascii	"main\000"
    .ident	"GCC: (GNU) 7.4.0"
I think its interesting to note the metadata inserted by the compiler such as the file location and compiler version. We can strip all of this down to a kind of mimium next (I added the infinite loop just so I could try and run it on an emulator):
    .section .text
    .globl main
    .ent main
    .type main, @function
main:
    .frame	$sp,0,$31		# vars= 0, regs= 0/0, args= 0, gp= 0
    .mask	0x00000000,0
    .fmask	0x00000000,0


# forever loop
infloop:
    li      $v0, 4
    li      $v1, 76
    b       infloop

    .end    main           # mark end of main function
Finally, after finishing the compilation using our minimal asm program, we can trace the code while running it on NO$PSX:
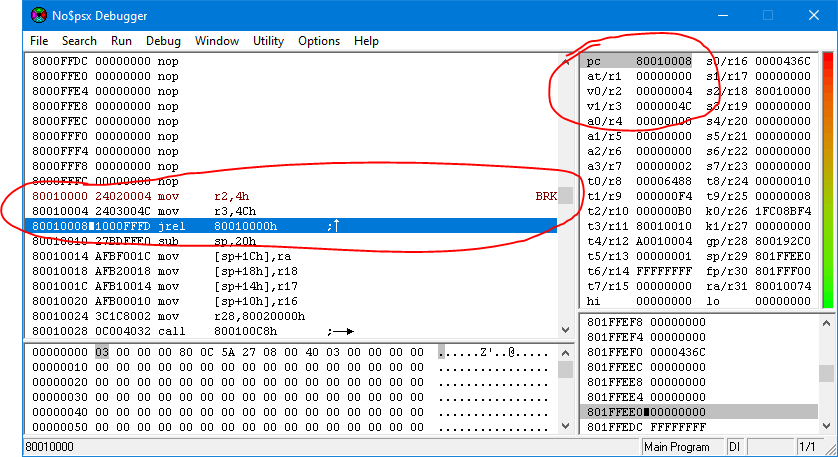
06/16/2020
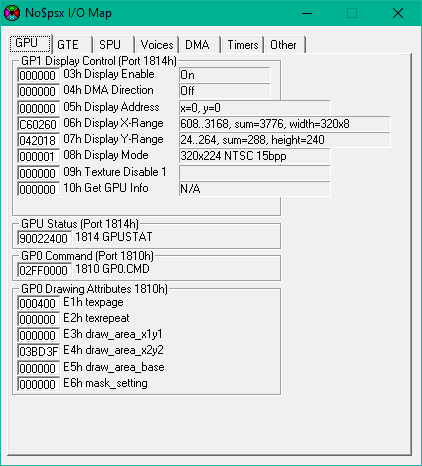
Further into MIPs assembly - Now I have a blue screen :). Following Peter Lemon's PSX assembly (although he uses a different assembler). Basically there are two registers for the GPU: GP0 and GP1 that you write to in order to give the GPU commands, such as setting screen info and drawing primitives. In NO$PSX, the status of the two registers is shown in the I/O map window under the GPU tab:
An example command is GPU reset, where GPURESET = 0x00<<24, GP1 = 0x1814, IO_BASE = 0x1F800000:
# Write GP1 - Reset GPU
    li $t0, GPURESET + (0 & 0xFFFFFF) # command = GPURESET, parameter = 0
    sw $t0, GP1($a0) # $a0 = IO_BASE
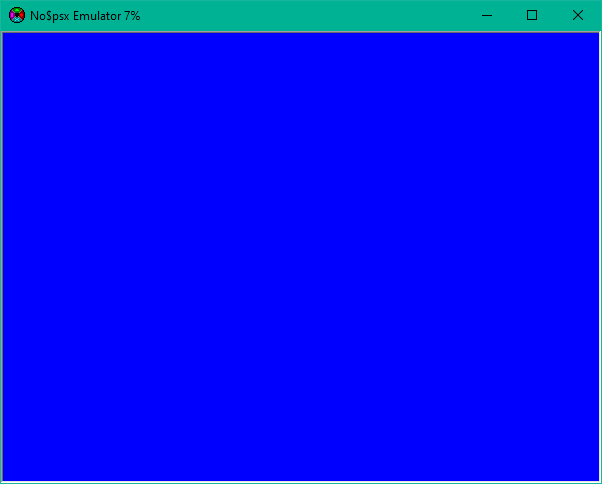
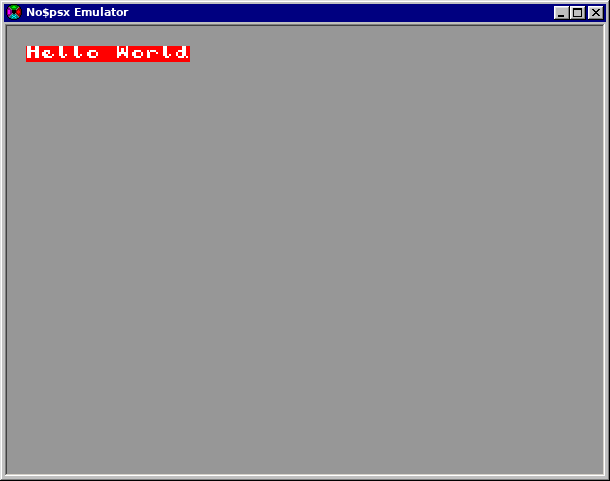
After initializing the GPU via writing to GP1, then sending render commands to GP0, we get the following blue screen
08/29/2020
Started merging psyq_util into the GameLib repository, where the PS2 programming code is. So far the PSX Renderer and PSX model class implementations are there. TODOs include the Camera, Light, Controller, and Vector/Matrix type generics (so vector/matrix code isn't specific to the platform, perhaps?). The easiest thing would be to have both impls use floating point, but that could possibly be quite slow on the playstation...
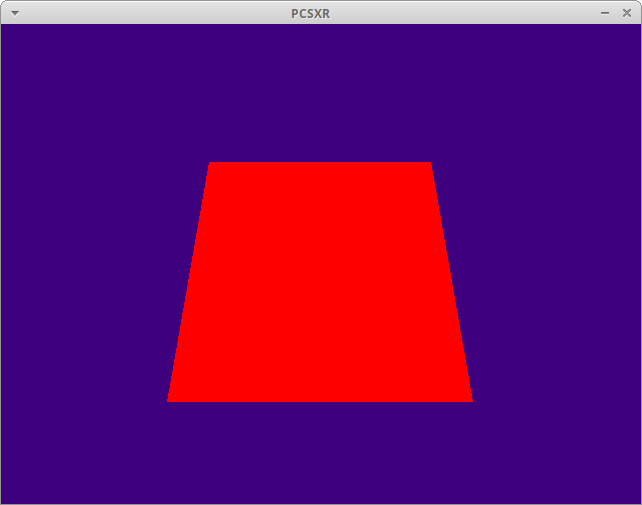
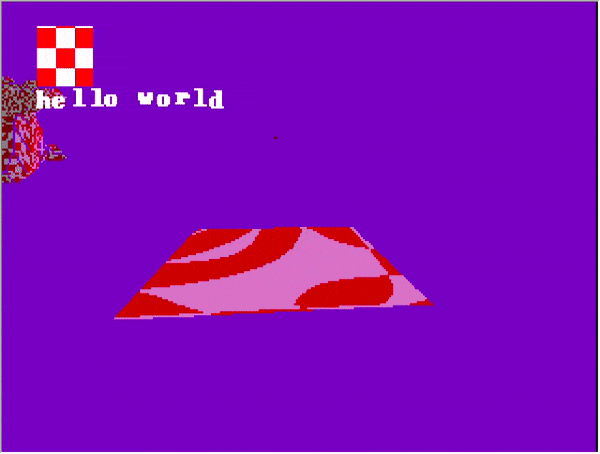
Here's a rotating floor object and then Suzanne, the blender monkey (the triangle colors are hard coded red currently in the renderer, as you can see):
The main loop code (from the PS2 Programming page) is now:
/*
 * GameLib test program
 */

#include "PlatformIncludes.h"
#include "SuzanneModel.h"

class FloorObject : public ModelImpl
{
public:

    FloorObject()
    {
        printf("FloorObject Constructor\n");
    }

    virtual ~FloorObject() {}

    void Init()
    {
        // TODO - make vector type agnostic
        // Top-down view
        static SVECTOR FloorVertices[4];// = {
        FloorVertices[0] = (SVECTOR){ -200, 0, -200, ONE }; // top left (right handed coords)
        FloorVertices[1] = (SVECTOR){  200, 0, -200, ONE }; // top right
        FloorVertices[2] = (SVECTOR){ -200, 0,  200, ONE }; // bottom left
        FloorVertices[3] = (SVECTOR){  200, 0,  200, ONE }; // bottom right
        //};
        static int FloorIndices[6] = (int[6]){
            0, 1, 2,    // bottom left triangle
            1, 3, 2     // top right triangle
        };
        static SVECTOR FloorColors[4];// = {
        FloorColors[0] = (SVECTOR){ ONE, 0, 0, ONE };
        FloorColors[1] = (SVECTOR){ 0, ONE, 0, ONE };
        FloorColors[2] = (SVECTOR){ 0, 0, ONE, ONE };
        FloorColors[3] = (SVECTOR){ 0, ONE,  ONE, ONE };
        //};
        static SVECTOR FloorNormals[4];// = {
        FloorNormals[0] = (SVECTOR){ 0, ONE, 0, ONE };
        FloorNormals[1] = (SVECTOR){ 0, ONE, 0, ONE };
        FloorNormals[2] = (SVECTOR){ 0, ONE, 0, ONE };
        FloorNormals[3] = (SVECTOR){ 0, ONE, 0, ONE };
        //};

        // internal member var
        mesh_data.Colors = FloorColors;
        mesh_data.Vertices = FloorVertices;
        mesh_data.Normals = FloorNormals;
        mesh_data.Indices = FloorIndices;
        mesh_data.VertexCount = 4;
        mesh_data.IndexCount = 6;

        // TODO - rename to match existing Model func
        UpdateModelMatrix();
    }
};

...

int main(int argc, char **argv)
{
#ifdef PS2_BUILD
    PS2Renderer Render;
    PS2Camera Cam;
    PS2Floor Floor;
    PS2Controller Pad;
    PS2Light Lights[4];
#endif

    FloorObject Floor;
    RendererImpl Render;
    MeshData ModelMeshData;
    ModelImpl SuzanneModel;
    ModelMeshData.IndexCount = num_suzanne_test_indices;
    ModelMeshData.VertexCount = num_suzanne_test_vertices;
    ModelMeshData.Vertices = suzanne_test_vertices;
    ModelMeshData.Indices = suzanne_test_indices;
    ModelMeshData.Normals = suzanne_test_normals;
    ModelMeshData.Colors = NULL;
    SuzanneModel.SetMeshData( ModelMeshData );

    // TODO - make units platform agnostic
    SuzanneModel.Translate( 0, 0, 4000 ); // notice pos z is forwards, left handed system

#ifdef PS2_BUILD
    Lights[0].SetDirection(  0.00f,  0.00f,  0.00f );
    Lights[1].SetDirection(  1.00f,  0.00f, -1.00f );
    Lights[2].SetDirection(  0.00f,  1.00f, -1.00f );
    Lights[3].SetDirection( -1.00f, -1.00f, -1.00f );
    Lights[0].SetColor( 0.00f, 0.00f, 0.00f );
    Lights[1].SetColor( 1.00f, 0.00f, 0.00f );
    Lights[2].SetColor( 0.30f, 0.30f, 0.30f );
    Lights[3].SetColor( 0.50f, 0.50f, 0.50f );
    Lights[0].SetType( Light::AMBIENT );
    Lights[1].SetType( Light::DIRECTIONAL );
    Lights[2].SetType( Light::DIRECTIONAL );
    Lights[3].SetType( Light::DIRECTIONAL );

    SifInitRpc(0);
#endif

    Render.Init();
    //Render.AttachCamera( Cam );
    //Render.AttachLight( Lights[0] );
    //Render.AttachLight( Lights[1] );
    //Render.AttachLight( Lights[2] );
    //Render.AttachLight( Lights[3] );

    Floor.Init();
    Floor.Translate( 0, 0, 500 );

    //Pad.Init(0);

    for (;;)
    {
        //Pad.Update();
        //RotateCamera( Pad, Cam );
        //TranslateCamera( Pad, Cam );

        //TeapotModel.Rotate( 0.0f, 0.01f, 0.0f );
        //Render.DrawModel( TeapotModel );

        //Floor.Rotate( 0.01f, 0.0f, 0.0f );
        //Floor.Rotate( 3, 0, 0 );
        //Render.DrawModel( Floor );

        SuzanneModel.Rotate( 1, 3, 0 );
        Render.DrawModel( SuzanneModel );

        Render.Update();
    }

    // Sleep
    //SleepThread();

    // End program.
    return 0;

}
11/04/2020
Working on getting an FPS camera implemented how it's done in the learnopengl tutorials, with a lookat matrix at the eye location + normalized front vector
Having trouble debugging because I can't seem to get floating point values to print out properly; they just show 'f'!:
float testNum = 3.14159;
printf("Test float: %f\n", testNum);
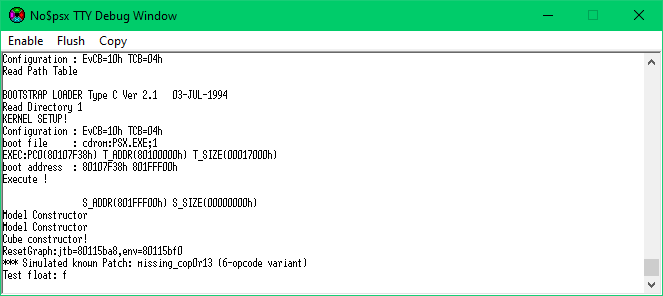
Printing the hex value of the float shows as follows:
float testNum = 3.14159;
printf("Test float: 0x%X\n", *((unsigned int*)&testNum));
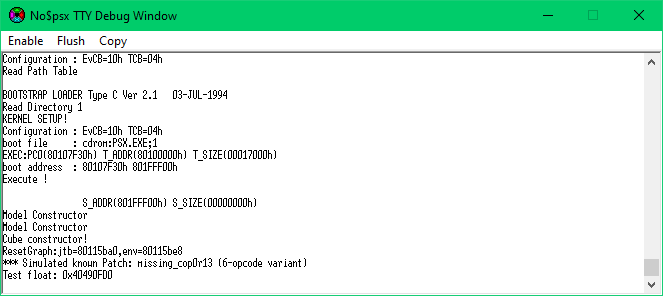
Which can be interpreted using a IEEE-754 Floating Point Converter: https://www.h-schmidt.net/FloatConverter/IEEE754.html
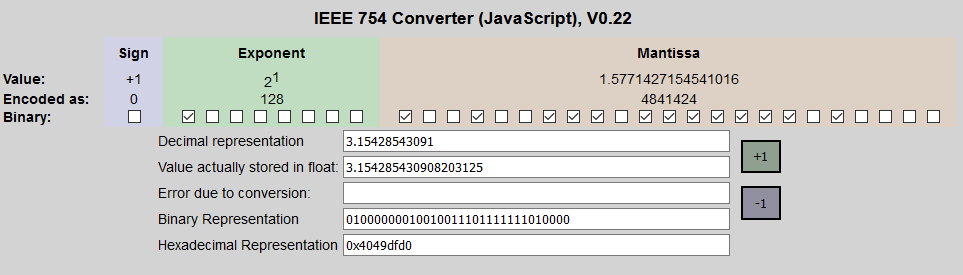
This shows the value is relatively close to our expected value of 3.14, however is inaccurate by about 0.01. What came to me as a simple solution is to multiply the float by 10000 to shift the decimal point left by 4, then print it as a decimal:
float testNum = 3.14159;
printf("Test float: %ld\n", (long)(testNum*10000.0));
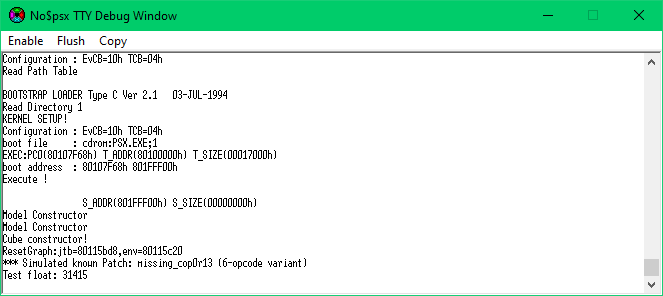
Which we can see gives us 31415. That'll probably have to be close enough.
During this I ended up reading about the binary ieee-754 floating point format: http://www.cs.yale.edu/homes/aspnes/pinewiki/C(2f)FloatingPoint.html
The only part I think wasn't explained very well is the 23 bits of mantissa; what that represents. I figured out that the mantissa binary value for ieee-754 is equal to 1.X, where X = (binary value)/(highest possible binary value). For example, 0b10000000000000000000000 translates to 0b10000000000000000000000/0b11111111111111111111111 = 4194304/8388608 = 0.5, but since the mantissa represents 1.X, the final mantissa value is 1.5.
11/06/2020
Got the FPS camera working, as well as adding the controller class back into the code.
It was interesting that in the first iteration of the code, using floats, the rotation calculation was extremely slow; you could visibly see the slowdown when running.
float dirX = cos( deg2rad(yaw) ) * cos( deg2rad(pitch) );
float dirY = sin( deg2rad(pitch) );
float dirZ = sin( deg2rad(yaw) ) * cos( deg2rad(pitch) );
setVector( &unnormalizedFront, (long)(dirX*ONE), (long)(dirY*ONE), (long)(dirZ*ONE) );
VectorNormal( &unnormalizedFront, &front );
After switching the floating point sin/cosine to the PSX fixed point sin/cosine, the code sped back up:
float radYaw = deg2rad( yaw );
float radPitch = deg2rad( pitch );

int cosYaw = rcos( (int)(radYaw*ONE) );
int cosPitch = rcos( (int)(radPitch*ONE) );
int sinYaw = rsin( (int)(radYaw*ONE) );
int sinPitch = rsin( (int)(radPitch*ONE) );

unnormalizedFront.vx = (cosYaw * cosPitch)>>12;
unnormalizedFront.vy = sinPitch;
unnormalizedFront.vz = (sinYaw * cosPitch)>>12;
VectorNormal( &unnormalizedFront, &front );
11/08/2020
Basic lighting is working. It seems like you can have a maximum of 3 lights as they are all stored in a single set of matrices (color, position, rotation). Todo is to extract and store the matrices inside the renderer instead so you can have multiple light objects (currently there can only be one light object since it stores the matrix).
Another important note is the order of setting the GTE values and matrix calculation: this order worked
PushMatrix();
CompMatrixLV( (MATRIX*)&camera->viewMat, (MATRIX*)&model.modelMat, &workMat );
if ( light != NULL )
{
    light->Use();
    light->Translate( workMat );
}
SetRotMatrix( &workMat );
SetTransMatrix( &workMat );
While this order didn't:
PushMatrix();
CompMatrixLV( (MATRIX*)&camera->viewMat, (MATRIX*)&model.modelMat, &workMat );
SetRotMatrix( &workMat );
SetTransMatrix( &workMat );
if ( light != NULL )
{
    light->Use();
    light->Translate( workMat );
}
where Light::Use() and Light::Translate() contain
void Light::Use()
{
    // TODO - setbackcolor - variable - is this ambient?
    SetBackColor( 63, 63, 63 );
    SetColorMatrix( &colorMat );
}
void Light::Translate( MATRIX& rottrans )
{
    MATRIX res; // resulting calculated matrix

    // calculate the angle matrix in relative screen coords
    RotMatrix( &angle, &angleMat );
    MulMatrix( &angleMat, &rottrans );

    // calculate the rottrans matrix for the light
    MulMatrix0( &posMat, &angleMat, &res );

    // send the resulting light matrix to the GTE
    SetLightMatrix( &res );
}
Which I think has to do with the fact that certain matrix calculation functions overwrite some GTE registers or something similar to that.
Here's the result:
11/11/2020
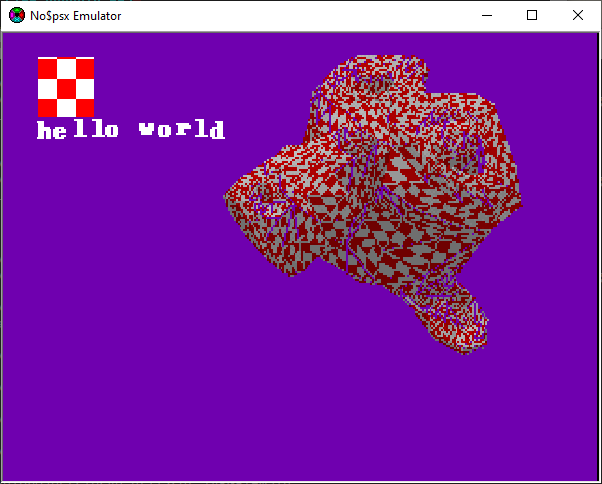
Moved the Light color and position matrices inside the renderer - this way we can try adding multiple lights. Still need to update the light class to reflect this.
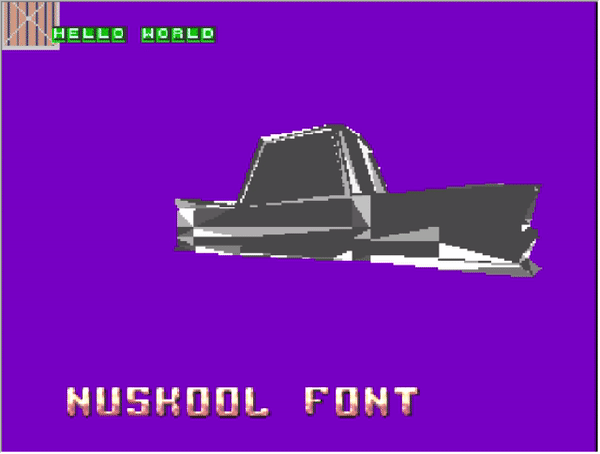
Also, added the font class back in. Tested with the 'Terminal' font in MS paint:

The result text looks uneven because I don't exactly have the correct width and height for each character:
12/06/2020
Updated the light class to reflect previous changes. Now the test program is using 2 lights, a red and blue. I need to fix the angle calculation as the light's angle moves along with the camera's currently.
Also, I may have fixed the hardware-crashing due to the controller class. Looking at one of the Pad examples in PSYQ showed that the graphics system was initted first, then the controller, without the call to ResetCallback(). Changing this *seems* to make the test program work on real hardware without crashing. Further testing needed.
Finally, added a floor to the test program to make it easier to stay oriented moving around.
12/28/2020
Created a PSX implementation of the Vector and Matrix structs from glampert's PS2 programs. I did this by starting with the same internal contents the VECTOR and MATRIX structures from the PSYQ sdk libgte, that way you can still run PSYQ functions on the structures as if they were the default/original VECTOR/MATRIX, so we can still use the GTE hardware acceleration functions. What makes the PSXMatrix implementation difficult, however, is the weird way the PSX/PSYQ stores matrices: unlike the normal 4x4 matrix you would expect as standard, the PSX uses a 3x3 array of shorts for rotation (int16_ts) and a separate 3x1 array of long ints (int32_ts) for translation. So not only is it annoying to have to specify/pull data from different arrays, their types are different and not interchangeable as well. Currently, from outside the PSXVector struct perspective, the data is treated as a 3x4 matrix, with the fourth column being the translation and the first three being the rotation
To see what I mean, Below is a comparison between the PSYQ vector from libgte.h:
 // LIBGTE.H; PSYQ lib implementation
typedef struct {		/* long word type 3D vector */
    long	vx, vy;
    long	vz, pad;
} VECTOR;
...
// PSXVector.h - my implementation
struct PSXVector
{
    PSXVector() { } // Uninitialized
    explicit PSXVector(long v); // Replicate to xyzw
    explicit PSXVector(const long v[4]);
...
    // equivalent to libgte VECTOR structure
    long x;
    long y;
    long z;
    long w;
};
And similar for MATRIX:
 // LIBGTE.H, PSYQ implementation
typedef struct  {
    short	m[3][3];	/* 3x3 rotation matrix */
        long    t[3];		/* transfer vector */
} MATRIX;
...
// PSXMatrix.h, my implementation
struct PSXMatrix
{
    PSXMatrix() { } // Uninitialized
    explicit PSXMatrix(const long data[][4]);
...
    // the same as in struct MATRIX in libgte.h
    short m[3][3];  // 3x3 rotation matrix
    long  t[3];     // transfer vector (translation)
};
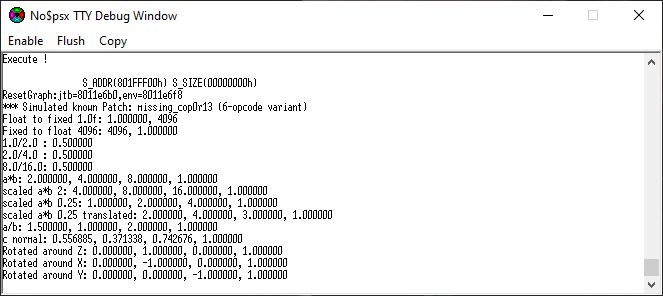
Some basic testing has been done with these classes (multiply, divide, scale, rotate), but I'm still not 100% confident in their accuracy yet:
static inline long float2fixed(const float a)
{
    return (long)(a * 4096);
}
static inline float fixed2float(const long a)
{
    return ((float)a) / 4096.0f;
}
#define PI 3.1415926535f
#define PI2 (PI*2.0f)
static inline long radians2fixed(const float radians)
{
    return (long)(4096.0f*(radians/PI2));
}
#define fixedDiv(a,b) ((long)((((long long)(a))<<12) / ((long long)(b))))

static void testRotate()
{
    PSXMatrix rotMat;
    rotMat.makeRotationZ( radians2fixed(PI/2.0f) );
    PSXVector testVec( float2fixed(1.0f), 0, 0, ONE );
    testVec = rotMat * testVec;
    printf2("Rotated around Z: %f, %f, %f, %f\n", fixed2float(testVec.x),
                                                  fixed2float(testVec.y),
                                                  fixed2float(testVec.z),
                                                  fixed2float(testVec.w) );

    rotMat.makeRotationX( radians2fixed(PI/2.0f) );
    testVec = PSXVector( 0, 0, float2fixed(1.0f), ONE );
    testVec = rotMat * testVec;
    printf2("Rotated around X: %f, %f, %f, %f\n", fixed2float(testVec.x),
                                                  fixed2float(testVec.y),
                                                  fixed2float(testVec.z),
                                                  fixed2float(testVec.w) );

    rotMat.makeRotationY( radians2fixed(PI/2.0f) );
    testVec = PSXVector( float2fixed(1.0f), 0, 0, ONE );
    testVec = rotMat * testVec;
    printf2("Rotated around Y: %f, %f, %f, %f\n", fixed2float(testVec.x),
                                                  fixed2float(testVec.y),
                                                  fixed2float(testVec.z),
                                                  fixed2float(testVec.w) );
}

int main(void)
{
    PSXMatrix testMat;
    PSXVector vecA;
    PSXVector vecB;
    PSXVector vecC;
    ...
    printf2("Float to fixed 1.0f: %f, %d\n", 1.0f, float2fixed(1.0f));
    printf2("Fixed to float 4096: %d, %f\n", 4096, fixed2float(4096));

    testMat.makeScaling(float2fixed(2.0f),float2fixed(2.0f),float2fixed(2.0f));

    vecA = PSXVector(float2fixed(1.0f), float2fixed(2.0f), float2fixed(4.0f), float2fixed(1.0f));
    vecB = PSXVector(float2fixed(3.0f), float2fixed(2.0f), float2fixed(4.0f), float2fixed(1.0f));
    vecC = PSXVector(float2fixed(3.0f), float2fixed(2.0f), float2fixed(4.0f), float2fixed(1.0f));

    vecA *= float2fixed(2.0f);
    vecB /= float2fixed(2.0f);
    vecC.normalizeSelf();

    printf2("1.0/2.0 : %f\n", fixed2float(fixedDiv(float2fixed(1.0f), float2fixed(2.0f))));
    printf2("2.0/4.0 : %f\n", fixed2float(fixedDiv(float2fixed(2.0f), float2fixed(4.0f))));
    printf2("8.0/16.0: %f\n", fixed2float(fixedDiv(float2fixed(8.0f), float2fixed(16.0f))));

    printf2("a*b: %f, %f, %f, %f\n", fixed2float(vecA.x),
                                     fixed2float(vecA.y),
                                     fixed2float(vecA.z),
                                     fixed2float(vecA.w) );
    vecA = testMat * vecA;
    printf2("scaled a*b 2: %f, %f, %f, %f\n", fixed2float(vecA.x),
                                              fixed2float(vecA.y),
                                              fixed2float(vecA.z),
                                              fixed2float(vecA.w) );
    testMat.makeScaling(float2fixed(0.25f),float2fixed(0.25f),float2fixed(0.25f));
    vecA = testMat * vecA;
    printf2("scaled a*b 0.25: %f, %f, %f, %f\n", fixed2float(vecA.x),
                                                 fixed2float(vecA.y),
                                                 fixed2float(vecA.z),
                                                 fixed2float(vecA.w) );

    testMat.makeTranslation(float2fixed(1.0f), float2fixed(2.0f), float2fixed(-1.0f));
    vecA = testMat * vecA;
    printf2("scaled a*b 0.25 translated: %f, %f, %f, %f\n", fixed2float(vecA.x),
                                                            fixed2float(vecA.y),
                                                            fixed2float(vecA.z),
                                                            fixed2float(vecA.w) );

    printf2("a/b: %f, %f, %f, %f\n", fixed2float(vecB.x),
                                     fixed2float(vecB.y),
                                     fixed2float(vecB.z),
                                     fixed2float(vecB.w) );
    printf2("c normal: %f, %f, %f, %f\n", fixed2float(vecC.x),
                                   fixed2float(vecC.y),
                                   fixed2float(vecC.z),
                                   fixed2float(vecC.w) );

    testRotate();
...
}
Which results in the following output from no$psx:
12/29/2020
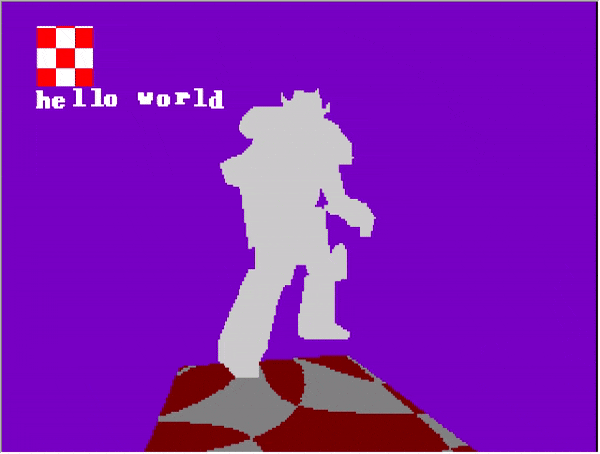
Untextured MD2 model loaded and rendered. The rendering part could use optimization. One possibility is to calculate and store the fixed point vertex values instead of converting during the render call (float2fixed()). Additionally, some of the internal code of GetFrameVertex() could be precalculated and stored as well. I'd like if possible to calculate FPS somehow in order to better measure performance. The main/important Md2 rendering code is within the PSXRenderer class:
// for each triangle
for ( u_int t = 0; t < model.md2TriangleCount; t++ )
{
SetPolyF3(prim);
const Md2Model::Vertex& vert0 = model.GetFrameVertex( frameIndex,
                                                      model.md2Triangles[t].vertex[0] );
const Md2Model::Vertex& vert1 = model.GetFrameVertex( frameIndex,
                                                      model.md2Triangles[t].vertex[1] );
const Md2Model::Vertex& vert2 = model.GetFrameVertex( frameIndex, model.md2Triangles[t].vertex[2]);


// TODO - tex coords

xyzPos[0].vx = fixedMul((fixedMul(frameScale[0], float2fixed(vert0.v[0])) + frameTranslate[0]), md2Scale);
xyzPos[0].vz = fixedMul((fixedMul(frameScale[1], float2fixed(vert0.v[1])) + frameTranslate[1]), md2Scale);
xyzPos[0].vy = fixedMul((fixedMul(frameScale[2], float2fixed(vert0.v[2])) + frameTranslate[2]), md2Scale);
xyzPos[1].vx = fixedMul((fixedMul(frameScale[0], float2fixed(vert1.v[0])) + frameTranslate[0]), md2Scale);
xyzPos[1].vz = fixedMul((fixedMul(frameScale[1], float2fixed(vert1.v[1])) + frameTranslate[1]), md2Scale);
xyzPos[1].vy = fixedMul((fixedMul(frameScale[2], float2fixed(vert1.v[2])) + frameTranslate[2]), md2Scale);
xyzPos[2].vx = fixedMul((fixedMul(frameScale[0], float2fixed(vert2.v[0])) + frameTranslate[0]), md2Scale);
xyzPos[2].vz = fixedMul((fixedMul(frameScale[1], float2fixed(vert2.v[1])) + frameTranslate[1]), md2Scale);
xyzPos[2].vy = fixedMul((fixedMul(frameScale[2], float2fixed(vert2.v[2])) + frameTranslate[2]), md2Scale);

// translate from local coordinates to screen
// coordinates using RotAverageNclip4()
// otz represents 1/4 value of the average of z
// value of each vertex
isomote = RotAverageNclip3(&xyzPos[0], // SVECTOR *v0, v1, v2
                           &xyzPos[1],
                           &xyzPos[2],

                          (long*)&(prim->x0),
                          (long*)&(prim->x1), // long *sxy0, sxy1, sxy2
                          (long*)&(prim->x2),

                          &p, &otz, &flg);

if (isomote > 0) {
    // If our depth is valid, add it to the order table
    if (otz > 0 && otz < OT_LEN) {
        setRGB0(prim, 127, 127, 127);
        addPrim( curBuffer->ot+otz, prim );
    }
}

// increment to the next packet area
prim++;
12/30/2020
Got the texture working for the MD2 model. There were a couple of steps frequired for this. First, I converted the original PNG texture to a 16-bit BMP with gimp. I also changed the size from 256x256 to 255x255 as I've had issues with 256 width textures (supposedly the max texture size for a single triangle is 256). Then converted the 16-bit bmp to a C array with my bmp2array tool. Next, when rendering the triangles via this code:
// translate from local coordinates to screen
// coordinates using RotAverageNclip4()
// otz represents 1/4 value of the average of z
// value of each vertex
isomote = RotAverageNclip3(&xyzPos[0], // SVECTOR *v0, v1, v2, v3
                           &xyzPos[1],
                           &xyzPos[2],

                          (long*)&(prim->x0),
                          (long*)&(prim->x1), // long *sxy0, sxy1
                          (long*)&(prim->x2), // long *sxy2, sxy3

                          &p, &otz, &flg);
The resulting triangles were back facing. After some fiddling, they were properly rendered by reversing the order of both the input and output to the Nclip3 function:
// translate from local coordinates to screen
// coordinates using RotAverageNclip4()
// otz represents 1/4 value of the average of z
// value of each vertex
isomote = RotAverageNclip3(&xyzPos[2], // SVECTOR *v0, v1, v2, v3
                           &xyzPos[1],
                           &xyzPos[0],

                          (long*)&(prim->x2),
                          (long*)&(prim->x1), // long *sxy0, sxy1
                          (long*)&(prim->x0), // long *sxy2, sxy3

                          &p, &otz, &flg);
After that, parts of the texture were being rendered as transparent:
This is due to the GPU interpreting completely black pixels (0x0000) as transparent. I tried to lazily fix this by replacing every 0x00,0x00 in the C texture array with 0x00,0x01, but that ended up adding green spots everywhere:
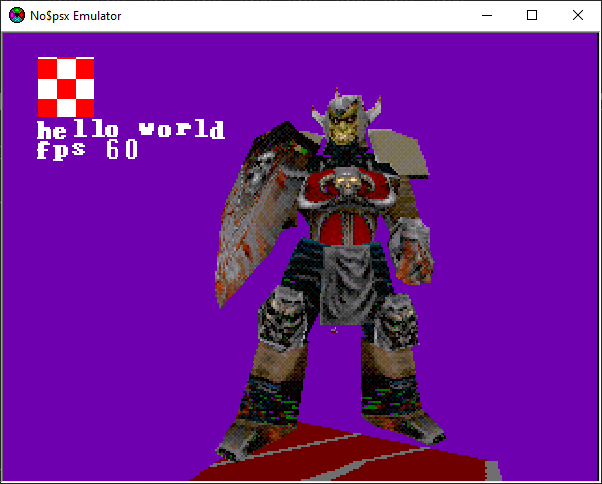
So instead I modified the bmp2array tool to accept a third argument, a 1 or a 0 to enable or disable transparency. If transparency is disabled, and the read pixel color is R=0,G=0,B=0, it instead sets the colors to R=0,G=0,B=1 so it's not completely black and hence transparent. Finally, instead of dividing the MD2 texture UV values by the texture width/height (how the PS2/glampert's code works), we take the raw MD2 UV vals as this matches what the PS1 expects, which is a direct pixel x,y value instead of a float from 0 to 1. we then get a nicely rendered model:
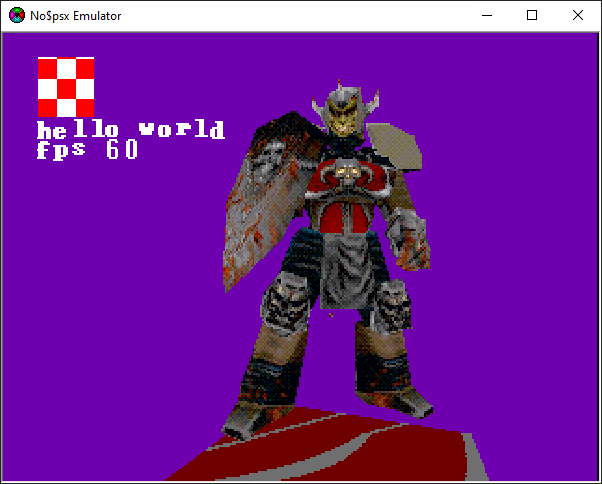
Also, you can see FPS is being printed. First I added number support to the font texture and logic. It assumes the numbers are stored starting on a row underneath the letters. Then, to calc FPS, I found code to calculate this here: https://github.com/sk-io/psx-engine/blob/main/src/main.c. It works by using a frame counter value incremented in the main game loop, while a VSync callback function increments a timer counter every horizontal vsync. The NO$PSX emulator shows the code running at 60fps, while on the PSX hardware I saw 30fps. I was able to optimize the MD2 drawing by replacing the float2fixed() function from floatVal*4096 to floatVal<<12.
01/01/2021
Got MD2 animation working like on the PS2. I ran into an issue of needing to use VECTOR (with long ints) instead of SVECTOR (with shorts) for intermediate values to be interpolated (as opposed to previously you could do all of the calculations at once and hence use a SVECTOR):
VECTOR xyzPosA[3];
VECTOR xyzPosB[3];
SVECTOR xyzPos[3]; // final linearly interpolated and scaled coord
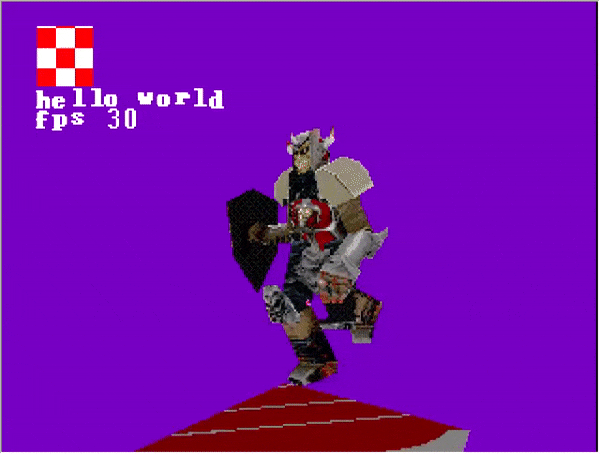
Above is part of the new code, whereas before for unanimated there was just xyzPos without the need to interpolate PosA and PosB. Additionally, twice the calculations are done in the beginning as we calculate for both frameA and frameB before interpolting between them. Now, the FPS is down to 30 on the emulator/20 on actual hardware :( I'll have to do some optimization
01/30/2021
Decided to play around with more low-level and assembly; I'd like to practice to really get better at it. I've started this by following Peter Lemon's PSX baremetal assembly, but with mips gcc instead of the assembler his repo uses.
I attempted to set up a gdb-to-emulator environment without success; neither Xavi92 pcsxr (link) or pcsx redux (link) methods seemed to work for me, at least when using gdb-multiarch.
I got NO$PSX working in linux instead using Wine and disabling audio, that way you can at least follow along and use breakpoints at the assembly level
Some notes about GNU Assembler syntax
- Define constants with
.equ NAME, VALUE - Comments start with #
- Macros take the form of
.macro NAME [param1, param2, ...] code ... .endm- Dereference parameters with a backslash (
\param)
- Dereference parameters with a backslash (
- Name registers with a $ (e.g.
$sp)
And some gcc inline assembly notes:
- Great resource here: link
- General syntax:
asm("quoted assembly code" : /* optional outputs */ : /* optional inputs */ : /* optional registers list */);- Inputs and outputs are derefenced as
%number
- Inputs and outputs are derefenced as
- x86_64 assembly mixed with C++: Youtube playlist
- Can define functions in assembly in an external file by declaring them as
extern "C" functionName(), then in the assembly file:global functionName functionName: code ... ret- The function return value should be stored in rax
I finally got a step further from the earlier assembly test and drew some text using a texture from Peter Lemon's PSX assembly, using raw C (no SDK libraries) instead (TODO - is to implement the same thing in raw ASM):
The code for this can be found here: Link
02/14/2021
Got an equivalent of the above draw text working in GNU assembler. Some notes/discoveries:
- I had to add the
.set noreorderdirective, otherwise the program wouldn't work. - I included an 'array' of data for the font texture by
- Converting the font*.bin to an array using bin2c
- Converting the C array format to
.data ArrayName: .byte 0x00 .byte 0x01 ... .text - Including the above asm array format in main.s via
.include "fontdata.s"
07/05/2021
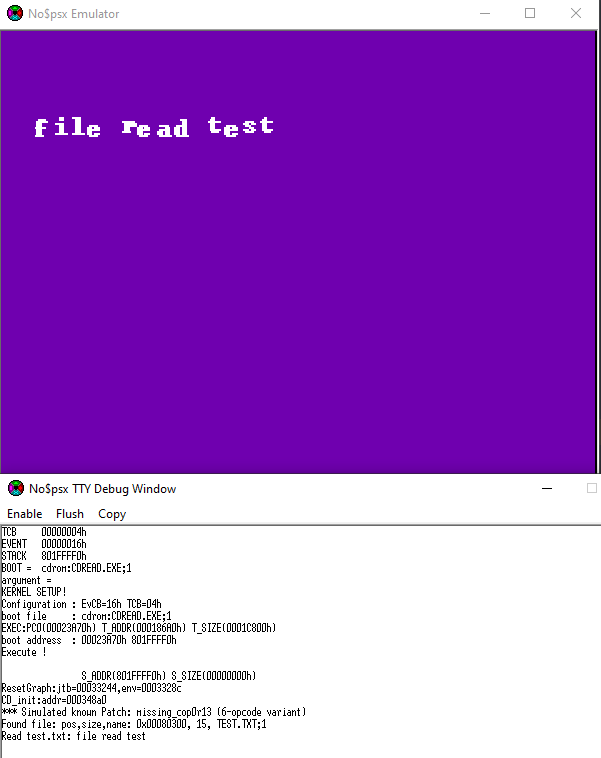
Working on file loading from CD. I was able to get a simple .txt file loaded after looking at the following resources:
- Orion's PSX library
- PSYQ CD intro powerpoint
- PSN00bSDK cd browser example
- PSYQ reference manual
I use psxsdk to create the CD .bin/.cue file, as psxsdk includes mkpskiso and mkisofs. First, CdSearchFile() was failing due to the file name needing to be upper case:
CdSearchFile( &fileStruct, "myfile.txt" ); // wrong!
CdSearchFile( &fileStruct, "\\MYFILE.TXT;1" ); // correct!
Next, I was having an error where the system was crashing after reading the file. It turned out you need to read in multiples of 2048 bytes, which is the size of a CD sector:
CdReadFile( fileName, (u_long*)buf, 12 ); // incorrect!

// correct!
unsigned long bufSize = fileStruct.size + (2048 - (fileStruct.size % 2048));
buf = new char[bufSize];
CdReadFile( fileName, (u_long*)buf, 0 ); // 0 defaults to reading the entire file
Once that worked, I read the contents of the file to be displayed by the renderer:
bool ReadFile( char* fileName, char* inBuf )
{
    char* buf = nullptr; // store the read file
    CdlFILE fileStruct;
    int i;
    int cnt;
    memset( &fileStruct, 0, sizeof(fileStruct) );

    // check disk status
    u_char result[8];
    CdControl( CdlNop, 0, result );
    if ( result[0] & CdlStatShellOpen )
    {
        if ( CdDiskReady(1) != CdlComplete )
        {
            printf("Shell open waiting\n");
            while ( CdDiskReady(0) != CdlComplete );
        }
    }

    // name MUST be uppsercase in the form "\\THE\\FILE\\PATH.EXT;1"
    unsigned long bufSize = 0;
    if ( CdSearchFile( &fileStruct, fileName ) == 0 )
    {
        printf( "CD search file failed (pos: 0x%X)\n", fileStruct.pos );
        return false;
    }
    else
    {
        printf( "Found file: pos,size,name: 0x%08X, %lu, %s\n",
                *((u_int*)&fileStruct.pos),
                fileStruct.size,
                fileStruct.name );
        const unsigned long sectorSize = 2048;
        unsigned long bufSize = fileStruct.size + (sectorSize - (fileStruct.size % sectorSize));
        buf = new char[bufSize];
    }


    // start the read operation
    // num bytes (size) must be a multiple of 2048
    //      reads entire file if num bytes is 0
    CdReadFile( fileName, (u_long*)buf, 0 );

    // wait for read operation to finish
    while (( cnt = CdReadSync(1, 0) ) > 0 );
    if ( cnt == -1 ) {
        printf( "CdReadSync error\n" );
        delete[] buf;
        return false;
    }
    memcpy( inBuf, buf, fileStruct.size );
    delete[] buf;
    buf = nullptr;

    return true;
}
...
if ( ReadFile( "\\TEST.TXT;1", textBuf ) )
{
    printf( "Read test.txt: %s\n", textBuf );
}
...
renderer.DrawString( font, 10, 50, textBuf );
Which looks like: